Basics of Models in Django
Last updated on July 27, 2020
We have learned quite a lot of things in the last few chapters. At this point, you should have a pretty good understanding of what Templates and Views are. In this chapter, we will learn about the Model part of the Django MTV architecture.
The Databases and Models #
Today most modern web applications are database driven. And SQL is the de facto language for accessing databases. If you have already done some Web programming then you would probably know in a language like PHP, it is very common to mix PHP code and SQL code. The problem with this approach is that it is messy, very very messy. With Django, we don't that, instead of executing raw SQL queries to create/modify/delete tables we use something called Models.
So What is a Model?
A Model defines fields and behaviors of the data you are storing. In simple words, a Model allows us to do following things:
- Create tables and define relationships between them.
- Modify tables and relationships between them.
- Access data stored in tables using Django ORM (without writing raw SQL).
Don't worry if all this passing over your head. In the next few sections, we are discussing everything in great depth.
Configuring Database #
Before we create models, we first need to configure our database with Django. Open settings.py file and scroll halfway through the page till you find DATABASE variable. If you haven't changed anything it should look like this:
TGDB/django_project/django_project/settings.py
1 2 3 4 5 6 7 8 | #...
DATABASES = {
'default': {
'ENGINE': 'django.db.backends.sqlite3',
'NAME': os.path.join(BASE_DIR, 'db.sqlite3'),
}
}
#...
|
The ENGINE specifies the the type of database backend Django is using. In our case we are using SQLite that's why it is set to 'django.db.backends.sqlite3'. Here are some other backends to choose from:
django.db.backends.mysqldjango.db.backends.oracledjango.db.backends.postgresql
The NAME specifies the name of the database we are using. As SQLite database consists of a single file, it currently points to the absolute path of the db.sqlite3 file.
As we will be using SQLite database throughout this tutorial you don't need to modify anything here. In fact, we are ready to create models.
However, If we were not using SQLite database then we would need to add some additional settings like USER, PASSWORD, HOST and PORT. For example, here is how you would configure Django to use MySQL database.
1 2 3 4 5 6 7 8 9 10 | DATABASES = {
'default': {
'ENGINE': 'django.db.backends.mysql',
'NAME': 'database_name',
'USER': 'database_user',
'PASSWORD': 'database_pass',
'HOST': '127.0.0.1',
'PORT': '5432',
}
}
|
What data we need? #
Before we code models, let's think about what data do we need to store in our database. As you know, we are creating a blog app. So we would need to store information about the following entities.
Post:
- title
- slug
- content
- publication date
Author:
- name
- active
- account creation date
- last logged in date
Category:
- name
- slug
Tag:
- name
- slug
Here we have outlined 4 entities Post, Author, Category and Tag. In the context of Database, each of these entities corresponds to a table and each attribute corresponds to a column. And in the context of Django framework, each entity is a model and each attribute is a field.
By default, Django automatically adds a primary key field called id to all models. You can refer to it using id or pk. The key automatically increments every time a new record is added.
You might be wondering what the slug means. In the URL http://example.com/very-important-post/, the slug is very-important-post. As we will see Django can automatically generate slug from the title.
Now let's take a look at what type of relationship exists between these entities.
A post may belong to any one author but an author can write many blog posts. So there exists a one-to-many relationship between author and post.
A post may belong to one category but a category can have multiple posts. So again there is a one-to-many relationship between category and post.
A post may belong to one or more tags. Similarly, each tag may have one or more posts. So there exists a many-to-many relationship between post and tags.
An author can create one or more categories but a category can only belong to one author. So, there is a one-to-many relationship between author and category.
An Author can create one or more tags but a tag can only belong one author. So, again there is a one-to-many relationship between author and tag.
In total, we have 4 one-to-many relationships and 1 many-to-many relationship.
We will see later how to define these relationships inside our models. For now, just remember these relationships exists between our entities.
Here is the updated list of attributes of each entity along with the relationship between them.
Author:
- name
- active
- account creation date
- last logged in date
Post:
- title
- slug
- content
- publication date
- Foreign key to author
- Foreign key to category
- Many-to-many relationship between post and Tag
Category:
- name
- slug
- Foreign key to author
Tag:
- name
- slug
- Foreign key to author
Creating Models #
Open models.py file inside the blog app located at TGDB/django_project/blog. It should look like this:
TGDB/django_project/blog/models.py
1 2 3 | from django.db import models
# Create your models here.
|
Let's start by creating an Author model. A model is just a Python class which inherits from models.Model class. Add the following code to models.py.
TGDB/django_project/blog/models.py
1 2 3 4 5 6 7 | from django.db import models
# Create your models here.
class Author(models.Model):
pass
|
Syntactically, Author is a valid model, although it doesn't contain any fields (or attributes), it is still valid. Generally, when we define model we specify the all the fields along with their types. As already said, Django automatically adds a primary key field called id for all models, so you don't need to define it manually. For Author model we want following fields:
- name
- active
- created_on
- last_logged_in
Here is the code to add these fields:
TGDB/django_project/blog/models.py
1 2 3 4 5 6 7 8 9 10 11 | from django.db import models
# Create your models here.
class Author(models.Model):
name = models.CharField(max_length=100, unique=True)
email = models.EmailField(unique=True)
active = models.BooleanField(default=False)
created_on = models.DateTimeField()
last_logged_in = models.DateTimeField()
|
Let's step through the code we have added.
In line 7, we are defining name field of type CharField, think of CharField type as VARCHAR in context of the database. The max_length argument specifies the maximum number of characters this field can store. The unique=True means that value of this field must be unique throughout the table. We can pass unique and max_length arguments to almost all types of fields.
In line 8, here we are defining email field of type EmailField. We want authors to have unique email id's that's why we have passed unique=True to the EmailField() constructor.
In line 9, we are defining active field which designates whether the user is active or not. The type of this field is BooleanField. A BooleanField field can only take two values True or False. You can also pass 1 and 0 to it. The default is a special argument and is used to set the default value for the column. This default value is used in the case when the value of the column is not supplied while creating a new record.
In line 10 and 11, we are defining two fields, created_on and last_logged_in of type DateTimeField. A DateTimeField is used to store date and time and it corresponds to datetime.datetime object in Python.
At this point, you might be thinking "Database already provides various types of data types to store data". So what's the purpose of redefining them in Django?
They serve two important purposes:
- They validate data before it is saved into the database.
- They also control how to display data in the form.
The first point is discussed in this section. And we will discuss the second point while discussing forms.
Note that both models.Model and model fields (i.e models.CharField, models.EmailField etc) are Python classes. In the context of Python CharField is a string. In the context of database CharField is VARCHAR. CharField is very special field because it is the basis for all the other string-based fields. Django doesn't validate contents of the field of type CharField. In other words, Django doesn't check the values provided to the CharField field. It makes sense if you think about it. As CharField is essentially a string field, it can take almost any type of data. So, 1, mymail@example.com, 100e100, DJANG0, %^%*&^%$# all are valid examples of data.
However, the fields which inherit from CharField do perform Validation. For example, the EmailField. The EmailField is commonly used to store email, if you try to store anything else in it, it will raise an exception.
Django provides many other fields to store different types of data. The following table lists some commonly used fields:
| Field Name | What it is used for? |
|---|---|
CharField |
A Field for storing small to medium-sized string. It acts as a base for other string-based fields. It doesn't provide any validation |
SlugField |
A CharField to store slug. It only accepts alphabets, numbers and underscores and hyphens. It provides validation. |
DateField |
A Field to store date. It corresponds to Python's datetime.date instance. It doesn't inherit from CharField. It provides validation. |
DateTimeField |
A Field to store date and time. It corresponds to Python's datetime.datetime instance. It provides validation. |
EmailField |
A CharField to store Email address. It verifies whether value entered value is valid email or not |
URLField |
A CharField used to store URL. It provides validation. Note that it is different from SlugField. The SlugField only contains a part of the URL, not the URL itself. It checks whether the entered data is valid or not. |
TextField |
A field to store a large amount of text. Use this field to store the content of blog post. In Python, this field translates to string. In databases, it translates to TEXT field. Like CharField this field doesn't provide any validation |
BooleanField |
A field to store True or False. In the context Python, it translates to boolean True and False. In the context of the database (as we are using SQLite) it is stored as an integer (1)True and (0) False. Remember SQLite has integer type to handle integers. |
IntegerField |
A field to store integer values from -2147483648 to 2147483647. It checks whether the value entered is number or not. |
DecimalField |
A field to store decimal number. |
ForeignKey |
A Field to define a one-to-many relationship. |
ManyToManyField |
A Field to define a many-to-many relationship. |
Optional Field Parameters #
The following are some optional field parameters available to all types of field. To use these parameters pass them as keyword arguments to model field class.
blank #
This parameter determines whether the field is required or not. By default, it is set to False, this is the reason why you are required to fill data in every field. If you set blank to True then field can be left empty.
default #
You can pass this parameter to set the default value of a Field.
unique #
If set to True then the value in the field will be unique throughout the table.
help_text #
This parameter is used to specify a help string. A help string describes how to use this field or some other important information regarding the field.
There are many other optional parameters, to view the full list of them check the Django documentation on field options.
Don't get overwhelmed by various field types and their parameters. You don't need to remember all of them. Let's say you want to use URLField and want to know it's parameter. Open your browser and visit https://docs.djangoproject.com/en/1.10/ref/models/fields/. This page contains documentation about every field type and their available options(parameters) in Django 1.10. Search the page for URLField keyword. Scroll down halfway through the page until you find a section describing URLField.
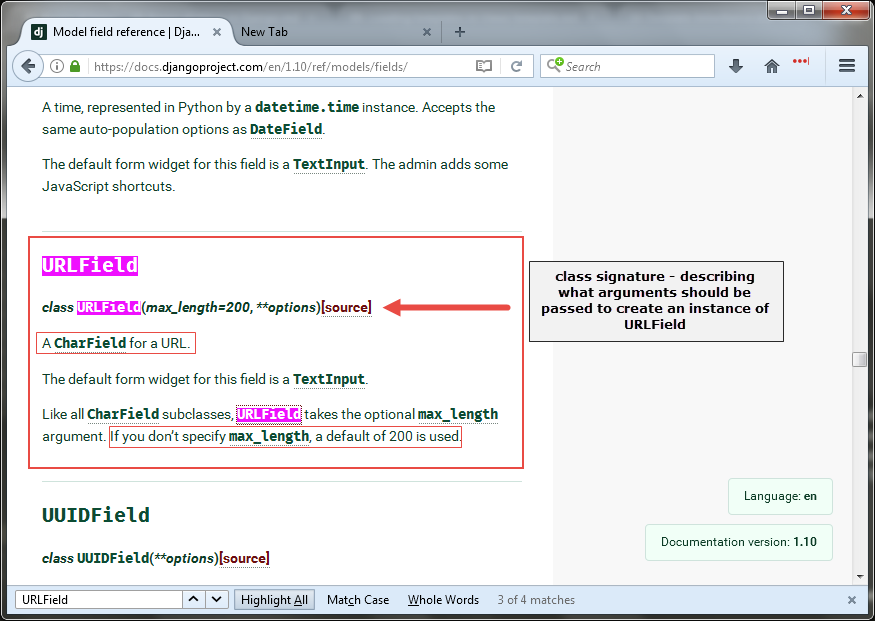
URLField documentation tells you following things:
The first line specifies the class signature. In other words, what arguments should be passed to create an instance of
URLField.It is
CharFieldfield means it inherits fromCharField.The default form widget for this field is a
TextInput- What is this? Earlier in the chapter, I told you that field types in Django are also used to create Forms. So this line tells us that aURLFieldwould be rendered asTextInput(it is a class that represents the input tag i.e<input type="text" ...>). Don't worry too much about it right now. We will discuss them in detail the upcoming chapters.The next line tells us we can also pass an optional
max_lengthparameter toURLFieldto limit the number of characters this field can take. If you don't specifymax_lengththen a default value of200will be used.
An astute reader might say but what about the second argument in class signature i.e **options?
The **options refers to the optional keyword arguments that all of the fields can take. We have covered some of them in this section.
Let's say you want to create unique URLField field of length 100. Here is the code to do that:
url = models.URLField(max_length=100, unique=True)
By default, all fields are required. If you don't specify data to a required field an exception will be thrown. To make the URL field optional add blank=True.
url = models.URLField(max_length=100, unique=True, blank=True)
Completing other Models #
Let's add the code for the remaining models.
TGDB/django_project/blog/models.py
1 2 3 4 5 6 7 8 9 10 11 12 13 14 15 16 17 18 19 20 21 22 23 24 25 26 27 28 | from django.db import models
# Create your models here.
class Author(models.Model):
name = models.CharField(max_length=50)
email = models.EmailField(unique=True)
active = models.BooleanField(default=False)
created_on = models.DateTimeField(auto_now_add=True)
last_logged_in = models.DateTimeField(auto_now=True)
class Category(models.Model):
name = models.CharField(max_length=100, unique=True)
slug = models.SlugField(max_length=100, unique=True)
class Tag(models.Model):
name = models.CharField(max_length=100, unique=True)
slug = models.SlugField(max_length=100, unique=True)
class Post(models.Model):
title = models.CharField(max_length=200)
slug = models.SlugField(unique=True)
content = models.TextField()
pub_date = models.DateTimeField(auto_now_add=True)
|
There is nothing new in above code except for two new parameters in DateTimeField (in Author and Post model). The auto_now parameter when set to True updates the value of the field automatically to current date and time every time an object (i.e an instance of Model) is saved. We use this parameter to commonly store last-modified timestamps. The important thing to note about this parameter is that it only updates the field when Model.save() method is called on the model instance. At this point, we haven't covered the save() method, so just keep this statement in mind, it will make more sense when we will discuss the save() method in Django ORM Basics lesson.
The auto_now_add parameter, when set to True automatically, sets the field value to current date and time when the object is first created.
You can also add these two parameters to the DateField. In that case, auto_now updates the value of the field automatically to current date every time object is saved. And auto_now_add parameter when set to True automatically sets the field value to the current date when the object is first created.
Adding relationship fields to our models #
In this section, we will learn how to add relationships between our models:
Recall that we have outlined the following the relationships between our models.
- A one-to-many relationship between Author and Post models.
- A one-to-many relationship between Category and Post models.
- A many-to-many relationship between Post and Tag models.
- A one-to-many relationship between Author and Category models.
- A one-to-many relationship between Author and Tag models.
Creating one-to-many relationship is simple, just add ForeignKey on the many side of the relationship and pass the name of the model you want to connect as a first parameter to the ForeignKey constructor.
Open models.py file and add the ForeignKey field to Category, Tag and Post models as follows:
TGDB/django_project/blog/models.py
1 2 3 4 5 6 7 8 9 10 11 12 13 14 15 16 17 18 19 20 21 22 23 | #...
class Category(models.Model):
name = models.CharField(max_length=100, unique=True)
slug = models.SlugField(max_length=100, unique=True)
author = models.ForeignKey(Author)
class Tag(models.Model):
name = models.CharField(max_length=100, unique=True)
slug = models.SlugField(max_length=100, unique=True)
author = models.ForeignKey(Author)
class Post(models.Model):
title = models.CharField(max_length=200)
slug = models.SlugField(unique=True)
content = models.TextField()
pub_date = models.DateTimeField(auto_now_add=True)
author = models.ForeignKey(Author)
category = models.ForeignKey(Category)
#...
|
Here we have added the four one-to-many relationships:
- The first is between
AuthorandCategory. - The second is between
AuthorandTag. - The third is between
PostandAuthor. - The fourth is between
PostandCategory.
Similarly, creating a many-to-many relationship is easy. In our case, we have a many-to-many relationship between Post and Tag models. To create many-to-many relationship add ManyToManyField field to any one side of the relationship. In other words, you can add ManyToManyField either in the Tag model or Post model. Just like ForeignKey field, it requires you to pass the name of the model you want to connect to.
Here is the code to add a many-to-many relationship between Post and Tag models.
TGDB/django_project/blog/models.py
1 2 3 4 5 6 7 8 9 10 11 12 | #...
class Post(models.Model):
title = models.CharField(max_length=200)
slug = models.SlugField(unique=True)
content = models.TextField()
pub_date = models.DateTimeField(auto_now_add=True)
author = models.ForeignKey(Author)
category = models.ForeignKey(Category)
tags = models.ManyToManyField(Tag)
#...
|
At this point, models.py file should look like this:
TGDB/django_project/blog/models.py
1 2 3 4 5 6 7 8 9 10 11 12 13 14 15 16 17 18 19 20 21 22 23 24 25 26 27 28 29 30 31 32 33 | from django.db import models
# Create your models here.
class Author(models.Model):
name = models.CharField(max_length=50)
email = models.EmailField(unique=True)
active = models.BooleanField(default=False)
created_on = models.DateTimeField(auto_now_add=True)
last_logged_in = models.DateTimeField(auto_now=True)
class Category(models.Model):
name = models.CharField(max_length=100, unique=True)
slug = models.SlugField(max_length=100, unique=True)
author = models.ForeignKey(Author)
class Tag(models.Model):
name = models.CharField(max_length=100, unique=True)
slug = models.SlugField(max_length=100, unique=True)
author = models.ForeignKey(Author)
class Post(models.Model):
title = models.CharField(max_length=200)
slug = models.SlugField(unique=True)
content = models.TextField()
pub_date = models.DateTimeField(auto_now_add=True)
author = models.ForeignKey(Author)
category = models.ForeignKey(Category)
tags = models.ManyToManyField(Tag)
|
We will continue adding missing elements to models.py file it but for now, it's enough.
We have now created some models. So what's next?
The next step is to create database tables from models. To create tables from models in Django we use something called migration.
Note: To checkout this version of the repository type git checkout 11a.
Load Comments