Django Rendering Form Fields Manually
Last updated on July 27, 2020
In the previous lesson, we have seen several methods to display forms. No doubt that these methods allow us to quickly create forms but they also give the least control over how they are rendered. If you want to have a pixel-perfect control over your forms read on.
Currently, our add_lang.html template looks like this:
djangobin/django_project/djangobin/templates/djangobin/add_lang.html
1 2 3 4 5 6 7 8 9 10 11 12 13 14 15 16 17 18 19 20 21 22 23 24 25 26 27 28 29 30 | {% extends "base.html" %}
{% block title %}
Add Lanugage
{% endblock %}
{% block content %}
<h2>Add a new Language</h2>
{% if messages %}
<ul class="messages">
{% for message in messages %}
<li{% if message.tags %} class="{{ message.tags }}"{% endif %}>{{ message }}</li>
{% endfor %}
</ul>
{% endif %}
<form action="" method="post">
{% csrf_token %}
<table>
{{ form.as_table }}
<tr>
<td></td>
<td><input type="submit"></td>
</tr>
</table>
</form>
{% endblock %}
|
Before we render each fields manually, replace the <form> tag with the following code:
1 2 3 4 5 6 7 8 9 10 11 12 13 14 15 16 17 18 19 20 21 22 23 24 25 26 27 28 29 30 31 32 33 34 35 36 37 38 39 40 41 | <form action="" method="post">
{% csrf_token %}
<table>
<tr>
<th>
<label for="id_name">Name:</label>
</th>
<td>
<input type="text" name="name" maxlength="100" id="id_name" />
</td>
</tr>
<tr>
<th>
<label for="id_lang_code">Language Code:</label>
</th>
<td>
<input type="text" name="lang_code" maxlength="100" id="id_lang_code" />
</td>
</tr>
<tr>
<th>
<label for="id_slug">Slug:</label>
</th>
<td>
<input type="text" name="slug" maxlength="100" id="id_slug" />
</td>
</tr>
<tr>
<th>
<label for="id_mime">Mime:</label>
</th>
<td>
<input type="text" name="mime" maxlength="100" id="id_mime" />
</td>
</tr>
<tr>
<td></td>
<td><input type="submit"></td>
</tr>
</table>
</form>
|
Point your browser to http://127.0.0.1:8000/add-lang/. Enter some data in the name and lang_code field (it doesn't matter whether the data is valid or not, just fill it) and leave the next two fields empty (i.e Slug and Mime). Finally hit the submit button. You will be displayed an empty form again.
Wait a minute! What's going on? All our form fields are required but Why it's now showing any errors?
The problem is that we are hardcoding our HTML, we are not using form methods like as_p() or as_table() to display the form fields. As a result, we are unable to show the bound state of the form to the user.
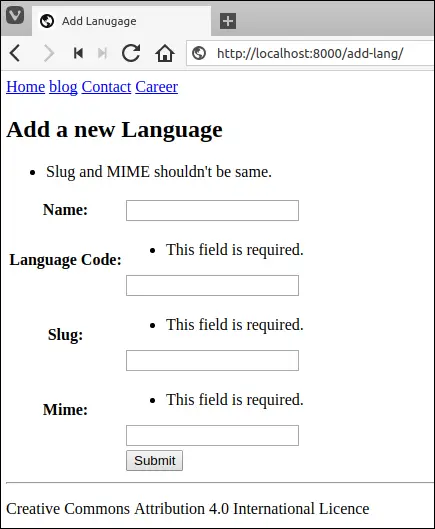
If we were using methods like as_p() or as_table() instead of hardcoding individual form field, we would get the validation errors as follows:
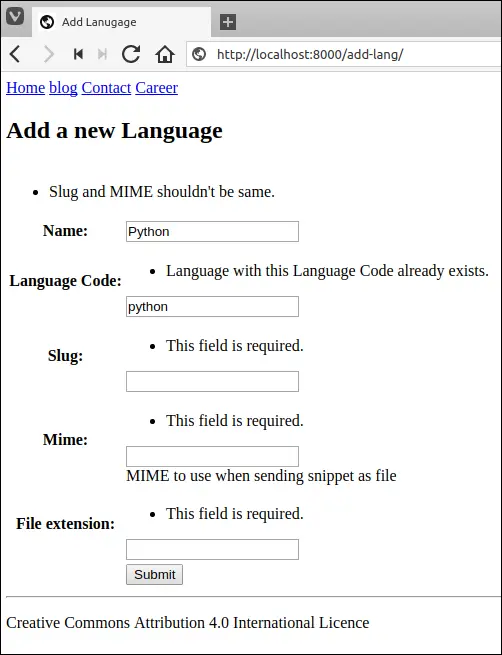
In addition to validation errors, the form is not pre-populating data (valid or invalid) we entered in the name and lang_code field while submitting the form in the last request.
In the following section, we will learn how to rectify all these problems.
Displaying field-specific errors #
To display errors associated with a particular field use form.field_name.errors variable. For example, this is how we can display errors associated with the name field.
1 2 3 4 5 6 7 8 | {# check whether there are any errors or not #}
{% if form.name.errors %}
<ul>
{% for error in form.name.errors %}
<li>{{ error }}</li>
{% endfor %}
{% endif %}
|
Open add_lang.html and modify the file as follows:
djangobin/django_project/djangobin/templates/djangobin/add_lang.html
1 2 3 4 5 6 7 8 9 10 11 12 13 14 15 16 17 18 19 20 21 22 23 24 25 26 27 28 29 | {# ... #}
<table>
<tr>
<td></td>
{% if form.name.errors %}
{% for error in form.name.errors %}
<td>{{ error }}</td>
{% endfor %}
{% endif %}
</tr>
<tr>
<th>
<label for="id_name">Name</label>
</th>
<td>
<input type="text" id="id_name" name="name">
</td>
</tr>
<tr>
<th>
<label for="id_email">Email</label>
</th>
<td>
<input type="email" id="id_email" name="email">
</td>
</tr>
{# ... #}
</table>
...
|
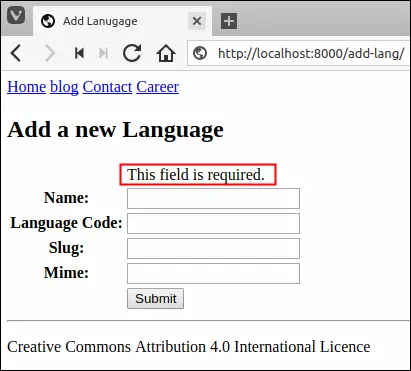
Visit http://127.0.0.1:8000/add-lang/ and hit submit button without entering data in any field. You should see This field is required. error message just above the name field as follows:
Displaying non-field errors #
Recall that we can override Form's clean() method to add validation which requires access to more than one fields. The errors raised by clean() method are not specific to any field, in fact, the errors belong to the whole form. In Django terminology we call such errors Non-field errors. To access non-field errors inside the template we use form.non_field_errors variable. For example, we can use the following code to display non-field errors in our feedback form.
1 2 3 4 5 6 7 | {% if form.non_field_errors %}
<ul>
{% for error in form.non_field_errors %}
<li>{{ error }}</li>
{% endfor %}
</ul>
{% endif %}
|
Open add_lang.html and modify it as follows:
djangobin/django_project/djangobin/templates/djangobin/add_lang.html
1 2 3 4 5 6 7 8 9 10 11 12 13 14 15 16 17 18 19 20 21 | {# ... #}
{% if messages %}
<ul class="messages">
{% for message in messages %}
<li{% if message.tags %} class="{{ message.tags }}"{% endif %}>{{ message }}</li>
{% endfor %}
</ul>
{% endif %}
{% if form.non_field_errors %}
<ul>
    {% for error in form.non_field_errors %}
        <li>{{ error }}</li>
    {% endfor %}
</ul>
{% endif %}
<form action="" method="post">
{% csrf_token %}
<table>
{# ... #}
|
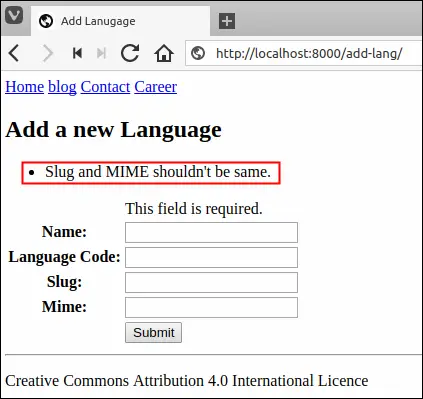
Visit Add language page, enter same data in slug and mime field and then hit submit. You will see a non-field error at the top of the form like this:
Using Shortcuts #
Django provides shortcuts to display field errors as well as non-field errors. We can also display the errors related to the name field as follows:
{{ form.name.errors }}
The above code is equivalent to:
1 2 3 4 5 6 7 | {% if form.name.errors %}
<ul class="errorlist">
{% for error in form.name.errors %}
<li>{{ error }}</li>
{% endfor %}
</ul>
{% endif %}
|
Similarly, we can display non-field errors using the following shortcut:
{{ form.non_field_errors }}
The above code is equivalent to:
1 2 3 4 5 6 7 | {% if form.non_field_errors %}
<ul class="errorlist">
{% for error in form.non_field_errors %}
<li>{{ error }}</li>
{% endfor %}
</ul>
{% endif %}
|
Open add_lang.html template and modify the file to use these shortcuts as follows:
djangobin/django_project/djangobin/templates/djangobin/add_lang.html
1 2 3 4 5 6 7 8 9 10 11 12 13 14 15 16 17 18 19 20 21 22 23 24 25 26 27 28 29 30 31 32 33 34 35 36 37 38 39 40 41 42 43 44 45 46 47 48 49 | {# ... #}
{% if messages %}
<ul class="messages">
{% for message in messages %}
<li{% if message.tags %} class="{{ message.tags }}"{% endif %}>{{ message }}</li>
{% endfor %}
</ul>
{% endif %}
{{ form.non_field_errors }}
<form action="" method="post">
{% csrf_token %}
<table>
<tr>
<th><label for="id_name">Name:</label></th>
<td>
{{ form.name.errors }}
<input type="text" name="name" required maxlength="100" id="id_name" />
</td>
</tr>
<tr>
<th><label for="id_lang_code">Language Code:</label></th>
<td>
{{ form.lang_code.errors }}
<input type="text" name="lang_code" required maxlength="100" id="id_lang_code" />
</td>
</tr>
<tr>
<th><label for="id_slug">Slug:</label></th>
<td>
{{ form.slug.errors }}
<input type="text" name="slug" required maxlength="100" id="id_slug" />
</td>
</tr>
<tr>
<th><label for="id_mime">Mime:</label></th>
<td>
{{ form.mime.errors }}
<input type="text" name="mime" required maxlength="100" id="id_mime" />
</td>
</tr>
<tr>
<td></td>
<td><input type="submit"></td>
</tr>
</table>
</form>
{# ... #}
|
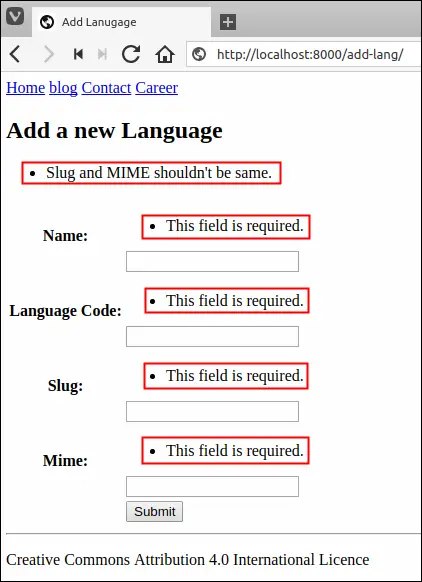
Visit http://127.0.0.1:8000/add-lang/ and hit submit button without entering anything, this time you should see This field is required. error message above every field.
Populating Field Values #
The biggest usability problem in our form is that in the bound state, it doesn't display any data that user has submitted in the previous request. For example, enter django in the name field and hit submit. You should see a form like this:
Notice that the name field has no data in it. Django provides bound field value in the variable form.field_name.value. So to display the data in the name field set the value attribute of corresponding <input> element to {{ form.name.value }}.
But there is one small problem. If the form is in unbound state the {{ form.name.value }} will print None. Therefore, you must always use the {% if %} tag to check the existence of a value in form.name.value variable first before displaying anything. For example:
1 2 3 4 5 | {% if form.name.value %}
<input type="text" id="id_name" name="name" value="{{ form.name.value }}">
{% else %}
<input type="text" id="id_name" name="name">
{% endif %}
|
Open add-lang.html and modify the form as follows:
djangobin/django_project/djangobin/templates/djangobin/add_lang.html
1 2 3 4 5 6 7 8 9 10 11 12 13 14 15 16 | {# ... #}
<form action="" method="post">
{% csrf_token %}
<table>
<tr>
<td><label for="id_name">Name</label></td>
<td>
{{ form.name.errors }}
{% if form.name.value %}
<input type="text" id="id_name" name="name" value="{{ form.name.value }}">
{% else %}
<input type="text" id="id_name" name="name">
{% endif %}
</td>
</tr>
{# ... #}
|
Visit http://127.0.0.1:8000/add-lang/ again, enter "django" in the name field and hit Submit.
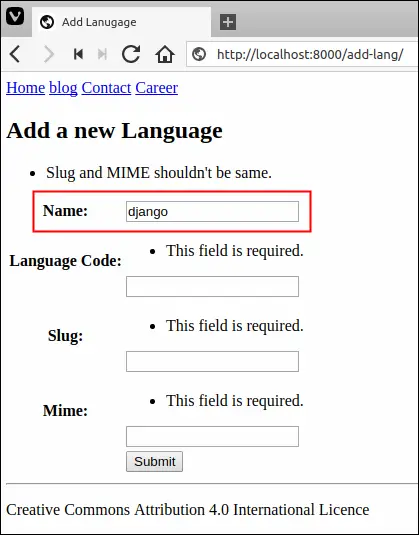
As expected our bound form is pre-populating data in the name field.
Django also provides {{ form.field_name }} shortcut to output the whole form field in bound as well as in unbound state. In other words, the {{ form.name }} is same as:
1 2 3 4 5 | {% if form.name.value %}
<input type="text" id="id_name" name="name" value="{{ form.name.value }}">
{% else %}
<input type="text" id="id_name" name="name">
{% endif %}
|
Open add_lang.html and modify the file to use this new shortcut as follows:
djangobin/django_project/djangobin/templates/djangobin/add_lang.html
1 2 3 4 5 6 7 8 9 10 11 12 13 14 15 16 17 18 19 20 21 22 23 24 25 26 27 28 29 30 31 32 33 34 35 36 37 38 39 40 41 42 43 44 45 46 47 48 49 | {# ... #}
{{ form.non_field_errors }}
<form action="" method="post">
{% csrf_token %}
<table>
<tr>
<th>
<label for="id_name">Name:</label>
</th>
<td>
{{ form.name.errors }}
{{ form.name }}
</td>
</tr>
<tr>
<th>
<label for="id_lang_code">Language Code:</label>
</th>
<td>
{{ form.lang_code.errors }}
{{ form.lang_code }}
</td>
</tr>
<tr>
<th>
<label for="id_slug">Slug:</label>
</th>
<td>
{{ form.slug.errors }}
{{ form.slug }}
</td>
</tr>
<tr>
<th>
<label for="id_mime">Mime:</label>
</th>
<td>
{{ form.mime.errors }}
{{ form.mime }}
</td>
</tr>
<tr>
<td></td>
<td><input type="submit"></td>
</tr>
</table>
</form>
{# ... #}
|
An important thing to note about this shortcut is that it generates id values of the form id_fieldname, so if the name of the field is name, then the value of id attribute would be id_name.
Our feedback form is now working as expected. It can display validation errors as well as pre-populate data from the previous request.
Displaying Labels #
Django provides the following two variables to generate label ids and label name respectively.
form.field_name.id_for_label.form.field_name.label.
Here is how we can use them inside the <label> tag.
<label for="{{ form.name.id_for_label }}">{{ form.name.label }}</label>
This would output:
<label for="id_name">Name</label>
Just like other fields, Django provides a shortcut to generate the complete <label> tag using {{ form.field_name.label_tag}} variable.
So, {{ form.name.label_tag }}
is equivalent to:
<label for="{{ form.name.id_for_label }}">{{ form.name.label }}</label>
Open add_lang.html and modify the file to use form.field_name.label_tag variable as follows:
djangobin/django_project/djangobin/templates/djangobin/add_lang.html
1 2 3 4 5 6 7 8 9 10 11 12 13 14 15 16 17 18 19 20 21 22 23 24 25 26 27 28 29 30 31 32 33 34 35 36 37 38 39 | {# ... #}
<form action="" method="post">
{% csrf_token %}
<table>
<tr>
<th>{{ form.name.label_tag }}</th>
<td>
{{ form.name.errors }}
{{ form.name }}
</td>
</tr>
<tr>
<th>{{ form.lang_code.label_tag }}</th>
<td>
{{ form.lang_code.errors }}
{{ form.lang_code }}
</td>
</tr>
<tr>
<th>{{ form.slug.label_tag }}</th>
<td>
{{ form.slug.errors }}
{{ form.slug }}
</td>
</tr>
<tr>
<th>{{ form.mime.label_tag }}</th>
<td>
{{ form.mime.errors }}
{{ form.mime }}
</td>
</tr>
<tr>
<td></td>
<td><input type="submit"></td>
</tr>
</table>
</form>
{# ... #}
|
Printing help_text #
We can also print the value of help_text attribute, if it is defined for a field in the model or form class. To print help_text we use {{ form.field_name.help_text }} variable.
Recall that, we have defined help_text attribute for the mime field in Language model as follows:
djangobin/django_project/djangobin/models.py
1 2 3 4 5 6 7 | #...
class Language(models.Model):
name = models.CharField(max_length=100)
lang_code = models.CharField(max_length=100, unique=True, verbose_name='Language Code')
slug = models.SlugField(max_length=100, unique=True)
mime = models.CharField(max_length=100, help_text='MIME to use when sending snippet as file.')
#...
|
Once again open add_lang.html and add {{ form.name.help_text }} just below {{ form.name }} as follows:
djangobin/django_project/djangobin/templates/djangobin/add_lang.html
1 2 3 4 5 6 7 8 9 10 11 12 13 14 15 16 17 18 19 20 | ...
<form action="" method="post">
{% csrf_token %}
<table>
...
<tr>
<th>{{ form.mime.label_tag }}</th>
<td>
{{ form.mime.errors }}
{{ form.mime }}
{{ form.mime.help_text }}
</td>
</tr>
<tr>
<td></td>
<td><input type="submit"></td>
</tr>
</table>
</form>
...
|
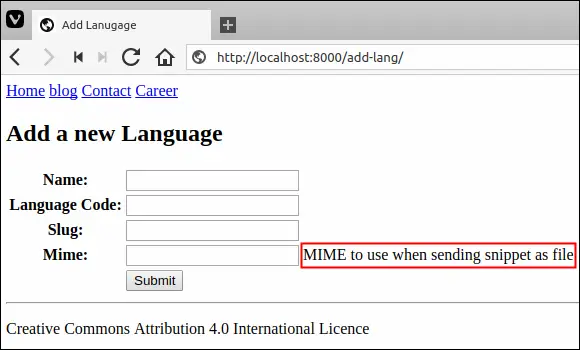
Visit http://127.0.0.1:8000/add-lang/ and you should see help_text beside the mime field as follows.
Looping over Form Fields #
Django has another trick under its sleeves which allows you shorten your code further. Instead of manually typing individual fields, we can simply loop over form fields using the following code.
1 2 3 4 5 6 7 8 9 10 11 12 13 14 15 16 17 18 19 20 21 22 23 24 25 | {# ... #}
<form action="" method="post">
{% csrf_token %}
<table>
{% for field in form %}
<tr>
<td>{{ field.label_tag }}</td>
<td>
{{ field.errors }}
{{ field }}
</td>
<td>
{% if field.help_text %}
{{ field.help_text }}
{% endif %}
</td>
</tr>
{% endfor %}
<tr>
<td></td>
<td><input type="submit" value="Submit"></td>
</tr>
</table>
</form>
{# ... #}
|
As usual, this method doesn't output <form> tag and submit button (<input type="submit">), you have to add them manually in your code.
So as you can see, there is a trade-off between the amount of code you type and the control you get. The less code affords us the least control. We will be using some of the variables we learned here while creating forms for the djangobin app.
Load Comments