Authentication in Flask
Last updated on July 27, 2020
Authentication is one of most critical and important aspect of a web application. It prevents unauthorized people to stay out of protected areas of a website. If you have a good understanding of cookies and know how to properly hash passwords you can roll out your own authentication system. This could be an interesting small project to test your skills.
As you might have already guessed there already exists an extension to make your life easier. Flask-Login is an extension which allows you to integrate authentication system into your Flask application easily. Install Flask-Login and its dependencies using the following command:
(env) overiq@vm:~/flask_app$ pip install flask-login
Creating User Model #
Right now, we are not storing any data about the users who will be administrator/publisher of our site. So our first task would be to create a User model to store the user data. Open main2.py file and add User model below the Employee model as follows:
flask_app/main2.py
1 2 3 4 5 6 7 8 9 10 11 12 13 14 | #..
class User(db.Model):
__tablename__ = 'users'
id = db.Column(db.Integer(), primary_key=True)
name = db.Column(db.String(100))
username = db.Column(db.String(50), nullable=False, unique=True)
email = db.Column(db.String(100), nullable=False, unique=True)
password_hash = db.Column(db.String(100), nullable=False)
created_on = db.Column(db.DateTime(), default=datetime.utcnow)
updated_on = db.Column(db.DateTime(), default=datetime.utcnow, onupdate=datetime.utcnow)
def __repr__(self):
return "<{}:{}>".format(self.id, self.username)
#...
|
To update our database, we need to create a new migration. In the terminal enter the following command to create the migration script:
(env) overiq@vm:~/flask_app$ python main2.py db migrate -m "Adding users table"
Run the migration using the upgrade command as follows:
1 2 3 4 5 6 7 | (env) overiq@vm:~/flask_app$ python main2.py db upgrade
INFO [alembic.runtime.migration] Context impl MySQLImpl.
INFO [alembic.runtime.migration] Will assume non-transactional DDL.
INFO [alembic.runtime.migration] Running upgrade 6e059688f04e -> 0f0002bf91cc,
Adding users table
(env) overiq@vm:~/flask_app$
|
This will create the users table in the database.
Hashing Passwords #
You must never store user passwords as plain text in the database. In case, a malicious user breaks into your database, he would be able to read all the passwords and email associated with it. It is a well-known fact that most people use the same password across multiple websites, that means an attacker may gain access to user's other online accounts as well.
Instead of storing password directly in the database, we will store password hash. A hash is simply a random looking, long string that looks like this:
pbkdf2:sha256:50000$Otfe3YgZ$4fc9f1d2de2b6beb0b888278f21a8c0777e8ff980016e043f3eacea9f48f6dea
A hash is created using one-way hash function. A one-way hash function takes a variable length input and returns a fixed length output which we call hash. What makes it secure is that once we have a hash, we can't get back the original string that generated it (hence one way). For the same input, the one-way hash function will always return the same result.
Here is the workflow involved when working with password hash:
When the user gives you their password (in the sign-up phase), hash it and then save the hash to the database. When the user logs in, create the hash from the entered password and then compare it with the hash stored in the database. If they match, log in the user. Otherwise, display an error message.
Flask ships with a package called Werkzeug which provides the following two helper functions for password hashing.
| Method | Description |
|---|---|
generate_password_hash(password) |
It accepts a password and returns a hash. By default, it uses pbkdf2 one-way function to generate the hash. |
check_password_hash(password_hash, password) |
It accepts password hash and password in plain text, then compares the hash of password with the password_hash. If both are same, it returns True, otherwise False. |
The following shell session shows how to work with these functions:
1 2 3 4 5 6 7 8 9 10 11 12 13 14 15 16 | >>>
>>> from werkzeug.security import generate_password_hash, check_password_hash
>>>
>>> hash = generate_password_hash("secret password")
>>>
>>> hash
'pbkdf2:sha256:50000$zB51O5L3$8a43788bc902bca96e01a1eea95a650d9d5320753a2fbd16be
a984215cdf97ee'
>>>
>>> check_password_hash(hash, "secret password")
True
>>>
>>> check_password_hash(hash, "pass")
False
>>>
>>>
|
Notice that when check_password_hash() is called with the correct password ( "secret password" ), it returns True and when called with wrong password ( "pass" ) it returns False.
Next, update User model to implement password hashing as follows (changes are highlighted):
flask_app/main2.py
1 2 3 4 5 6 7 8 9 10 11 12 13 14 15 16 17 18 | #...
from werkzeug.security import generate_password_hash, check_password_hash
#...
#...
class User(db.Model):
#...
updated_on = db.Column(db.DateTime(), default=datetime.utcnow, onupdate=datetime.utcnow)
def __repr__(self):
return "<{}:{}>".format(self.id, self.username)
def set_password(self, password):
self.password_hash = generate_password_hash(password)
def check_password(self, password):
return check_password_hash(self.password_hash, password)
#...
|
Let's create some users and put password hashing to test.
1 2 3 4 5 6 7 8 9 10 11 12 13 14 15 16 17 18 19 20 21 22 23 24 25 26 27 28 | (env) overiq@vm:~/flask_app$ python main2.py shell
>>>
>>> from main2 import db, User
>>>
>>> u1 = User(username='spike', email='spike@example.com')
>>> u1.set_password("spike")
>>>
>>> u2 = User(username='tyke', email='tyke@example.com')
>>> u2.set_password("tyke")
>>>
>>> db.session.add_all([u1, u2])
>>> db.session.commit()
>>>
>>> u1, u2
(<1:spike>, <2:tyke>)
>>>
>>>
>>> u1.check_password("pass")
False
>>> u1.check_password("spike")
True
>>>
>>> u2.check_password("foo")
False
>>> u2.check_password("tyke")
True
>>>
>>>
|
As the output shows, everything is working as expected and we now have two users in our database.
Integrating Flask-Login #
To initialize Flask-Login import LoginManager class from flask_login package and create a new instance of LoginManager as follows (changes are highlighted):
1 2 3 4 5 6 7 8 9 10 11 12 13 14 15 16 17 18 19 20 21 22 23 | #...
from werkzeug.security import generate_password_hash, check_password_hash
from flask_login import LoginManager
app = Flask(__name__)
app.debug = True
app.config['SECRET_KEY'] = 'a really really really really long secret key'
app.config['SQLALCHEMY_DATABASE_URI'] = 'mysql+pymysql://root:pass@localhost/flask_app_db'
app.config['SQLALCHEMY_TRACK_MODIFICATIONS'] = False
app.config['MAIL_SERVER'] = 'smtp.googlemail.com'
app.config['MAIL_PORT'] = 587
app.config['MAIL_USE_TLS'] = True
app.config['MAIL_USERNAME'] = 'infooveriq@gmail.com'
app.config['MAIL_DEFAULT_SENDER'] = 'infooveriq@gmail.com'
app.config['MAIL_PASSWORD'] = 'password'
manager = Manager(app)
manager.add_command('db', MigrateCommand)
db = SQLAlchemy(app)
migrate = Migrate(app, db)
mail = Mail(app)
login_manager = LoginManager(app)
#...
|
To authenticate users, Flask-Login requires you implement a handful special methods in the User class. The following table lists the required methods:
| Method | Description |
|---|---|
is_authenticated() |
returns True if user is authenticated (i.e logged in). Otherwise False. |
is_active() |
returns True if account is not suspended. Otherwise False. |
is_anonymous() |
returns True for anonymous users (i.e users who are not logged in). Otherwise False. |
get_id() |
returns a unique identifier for the User object. |
Flask-Login also provides default implementation of these methods via UserMixin class. So, instead of defining all these methods manually, we could just inherit them from the UserMixin class. Open main2.py and modify the User model header as follows:
flask_app/main2.py
1 2 3 4 5 6 7 | #...
from flask_login import LoginManager, UserMixin
#...
class User(db.Model, UserMixin):
__tablename__ = 'users'
#...
|
The only thing remaining is to add a user_loader callback. Just above the User model add the following method.
flask_app/main2.py
1 2 3 4 5 | #...
@login_manager.user_loader
def load_user(user_id):
return db.session.query(User).get(user_id)
#...
|
The function decorated with user_loader decorator will be called everytime a request comes to the server. It loads the user from the user id stored in the session cookie. Flask-Login makes the loaded user accessible via current_user proxy. To use current_user import it from flask_login package. It acts like a global variable and is available in view functions and in templates. At any point, current_user either references a logged in user or an anonymous user. We can differentiate between the two using is_authenticated attribute of the current_user. For anonymous users is_authenticated attribute returns False, otherwise True.
Restricting Access to Views #
As things stand, we don't have any admin area in our site. For this lesson, admin area will be represented by a dummy page. To prevent unauthorized users from accessing protected pages Flask-Login provides a decorator named login_required. In main2.py, add the following code just below the updating_session() view function:
flask_app/main2.py
1 2 3 4 5 6 7 8 | #...
from flask_login import LoginManager, UserMixin, login_required
#...
@app.route('/admin/')
@login_required
def admin():
return render_template('admin.html')
#...
|
The login_required decorator ensures that the admin() view function is called only when a user is logged in. By default, when an anonymous user (a user who is not logged in) attempts to visit a protected view, he will be displayed HTTP 401 Unauthorized page.
Start the server, if not already running and visit http://localhost:5000/admin/. You will be displayed a page like this:
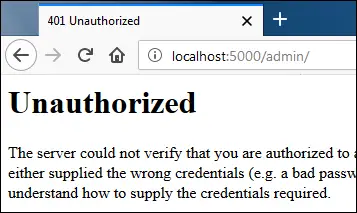
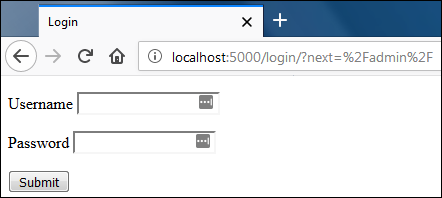
Rather than showing 401 unauthorized error, a better approach would be to redirect the user to the login page. To make this happen set the login_view attribute of the LoginManager instance to the login() view function as follows (changes are highlighted):
flask_app/main2.py
1 2 3 4 5 6 7 8 9 | #...
migrate = Migrate(app, db)
mail = Mail(app)
login_manager = LoginManager(app)
login_manager.login_view = 'login'
class Faker(Command):
'A command to add fake data to the tables'
#...
|
Currently, the login() function is defined as follows (we are soon going to change it):
flask_app/main2.py
1 2 3 4 5 6 7 8 9 10 11 12 13 14 15 16 | #...
@app.route('/login/', methods=['post', 'get'])
def login():
message = ''
if request.method == 'POST':
print(request.form)
username = request.form.get('username')
password = request.form.get('password')
if username == 'root' and password == 'pass':
message = "Correct username and password"
else:
message = "Wrong username or password"
return render_template('login.html', message=message)
#...
|
Now visit http://localhost:5000/admin/ and you will be redirected to the login page:
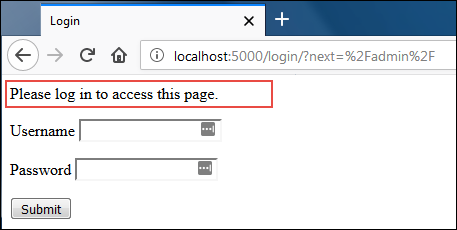
Flask-Login also sets flash message when a user is redirected to the login page, but we didn't see any message because the login template (template/login.html) is not displaying any flash message. Open login.html and add the following code just before the <form> tag as follows (changes are highlighted):
flask_app/templates/login.html
1 2 3 4 5 6 7 8 9 | #...
{% endif %}
{% for category, message in get_flashed_messages(with_categories=true) %}
<spam class="{{ category }}">{{ message }}</spam>
{% endfor %}
<form action="" method="post">
#...
|
Visit http://localhost:5000/admin/ again. This time you will see the flash message on the login page as follows:
To change the flash message simply assign a new message to the login_message attribute of the LoginManager instance.
While we are at it, let's create the template used by admin() view function. Create a new template name admin.html with the following code:
flask_app/templates/admin.html
1 2 3 4 5 6 7 8 9 10 11 12 13 14 15 16 17 18 19 | <!DOCTYPE html>
<html lang="en">
<head>
<meta charset="UTF-8">
<title>Title</title>
</head>
<body>
<h2>Logged in User details</h2>
<ul>
<li>Username: {{ current_user.username }}</li>
<li>Email: {{ current_user.email }}</li>
<li>Created on: {{ current_user.created_on }}</li>
<li>Updated on: {{ current_user.updated_on }}</li>
</ul>
</body>
</html>
|
Here we are using current_user variable to print the details of the logged in user.
Creating Login Form #
Before we log in, we need a login form. The login form will have three fields: username, password, and remember me. Open forms.py and add LoginForm class just below the ContactForm class as follows (changes are highlighted):
flask_app/forms.py
1 2 3 4 5 6 7 8 9 | #...
from wtforms import StringField, SubmitField, TextAreaField, BooleanField, PasswordField
#...
#...
class LoginForm(FlaskForm):
username = StringField("Username", validators=[DataRequired()])
password = PasswordField("Password", validators=[DataRequired()])
remember = BooleanField("Remember Me")
submit = SubmitField()
|
Logging In Users #
To log in a user Flask-Login provides login_user() function. It accepts user object to log in. On success, it returns True and establishes a session. Otherwise, it returns False. By default, the session established by login_user() expires when the browser is closed. To let the users remain logged in for a long period of time pass remember=True to login_user() function while logging in a user. Open main2.py and modify login() view function as follows (changes are highlighted):
flask_app/main2.py
1 2 3 4 5 6 7 8 9 10 11 12 13 14 15 16 17 18 19 | #...
from forms import ContactForm, LoginForm
#...
from flask_login import LoginManager, UserMixin, login_required, login_user, current_user
#...
@app.route('/login/', methods=['post', 'get'])
def login():
form = LoginForm()
if form.validate_on_submit():
user = db.session.query(User).filter(User.username == form.username.data).first()
if user and user.check_password(form.password.data):
login_user(user, remember=form.remember.data)
return redirect(url_for('admin'))
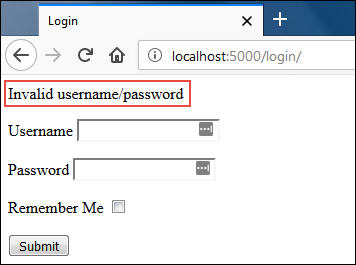
flash("Invalid username/password", 'error')
return redirect(url_for('login'))
return render_template('login.html', form=form)
#...
|
Next, We need to update login.html to use LoginForm() class. Open login.html and modify it as follows (changes are highlighted):
flask_app/templates/login.html
1 2 3 4 5 6 7 8 9 10 11 12 13 14 15 16 17 18 19 20 21 22 23 24 25 26 27 28 29 30 31 32 33 34 35 36 37 38 39 40 41 42 43 | <!DOCTYPE html>
<html lang="en">
<head>
<meta charset="UTF-8">
<title>Login</title>
</head>
<body>
{% for category, message in get_flashed_messages(with_categories=true) %}
<spam class="{{ category }}">{{ message }}</spam>
{% endfor %}
<form action="" method="post">
{{ form.csrf_token }}
<p>
{{ form.username.label() }}
{{ form.username() }}
{% if form.username.errors %}
{% for error in form.username.errors %}
{{ error }}
{% endfor %}
{% endif %}
</p>
<p>
{{ form.password.label() }}
{{ form.password() }}
{% if form.password.errors %}
{% for error in form.password.errors %}
{{ error }}
{% endfor %}
{% endif %}
</p>
<p>
{{ form.remember.label() }}
{{ form.remember() }}
</p>
<p>
{{ form.submit() }}
</p>
</form>
</body>
</html>
|
We are now ready to login. Visit http://localhost:5000/admin and you will be redirected to the login page.
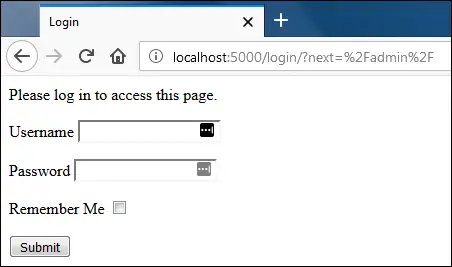
Enter correct username and password and hit submit. You will be redirected to the admin page which should look like this:
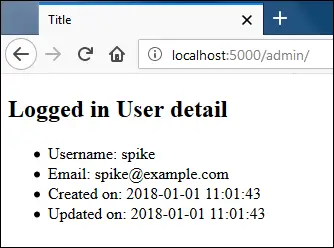
In case you didn't check "Remember Me" checkbox while logging in you will be logged out as soon as the browser is closed. Otherwise, you will remain logged in.
On entering invalid username or password, you will be redirected to login page along with a flash message which looks like this:
Logging Out Users #
The logout_user() function of Flask-Login logouts a user by removing the user id stored in the session. In the main2.py file, add the following code below the login() view function:
flask_app/main2.py
1 2 3 4 5 6 7 8 9 10 | #...
from flask_login import LoginManager, UserMixin, login_required, login_user, current_user, logout_user
#...
@app.route('/logout/')
@login_required
def logout():
logout_user()
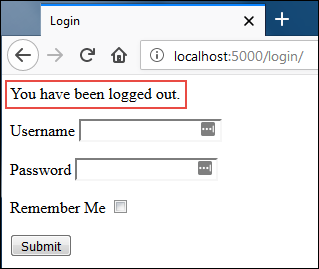
flash("You have been logged out.")
return redirect(url_for('login'))
#...
|
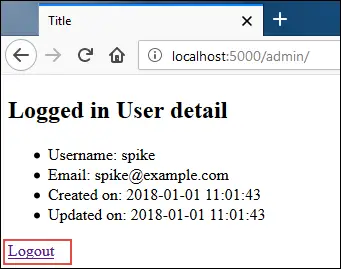
Next, update the admin.html template to include a link to logout route as follows (changes are highlighted):
flask_app/templates/admin.html
1 2 3 4 5 6 7 8 9 10 11 12 | #...
<ul>
<li>Username: {{ current_user.username }}</li>
<li>Email: {{ current_user.email }}</li>
<li>Created on: {{ current_user.created_on }}</li>
<li>Updated on: {{ current_user.updated_on }}</li>
</ul>
<p><a href="{{ url_for('logout') }}">Logout</a></p>
</body>
</html>
|
If you now visit http://localhost:5000/admin/ (assuming you are logged in), you will see a logout link at the bottom of the page.
To logout click the link and you will be redirected to the login page.
The Final Touch #
There is one small problem with the login page. Right now, if a logged in user visits http://localhost:5000/login/, he will again see the login page. There is no point in displaying the login form to a user who is already logged. To solve this problem make the following changes in the login() view function.
flask_app/main2.py
1 2 3 4 5 6 7 8 | #...
@app.route('/login/', methods=['post', 'get'])
def login():
if current_user.is_authenticated:
return redirect(url_for('admin'))
form = LoginForm()
if form.validate_on_submit():
#...
|
After these changes, if a logged in user visits the login page, he will be redirected to the admin page.
Load Comments