Custom Response and Hook Points in Flask
Last updated on July 27, 2020
Custom Response #
Flask provides three different patterns for creating response:
- As a string or using a template engine.
- As a response object.
- As a tuple in the form
(response, status, headers)or(response, headers).
Let's take a look at these patterns one by one.
Creating Response as a String #
1 2 3 | @app.route('/books/<genre>')
def books(genre):
return "All Books in {} category".format(genre)
|
So far we have used this pattern to send the response to the client. When Flask sees that we are returning a string from a view function it automatically converts the string into a response object ( using make_response() method ) with string as the body of the response, HTTP status code of 200 and content-type header set to text/html. Most of the time that's all you need. However, sometimes you would need to set some additional headers before sending the response to the client. For such cases, you have to create the response using the make_response() function.
Creating response using make_response() #
The syntax of the make_response() is as follows:
res_obj = make_response(res_body, status_code=200)
The res_body is the required argument which represents the response body and status_code is the optional HTTP status code which defaults to 200.
The following listing shows how to set additional headers using the make_response() function.
1 2 3 4 5 6 7 8 | from flask import Flask, make_response,
@app.route('/books/<genre>')
def books(genre):
res = make_response("All Books in {} category".format(genre))
res.headers['Content-Type'] = 'text/plain'
res.headers['Server'] = 'Foobar'
return res
|
The following listing shows how you can return HTTP 404 error using the make_response() function.
1 2 3 | @app.route('/')
def http_404_handler():
return make_response("<h2>404 Error</h2>", 400)
|
Setting cookies is another common task in a web application. The make_response() function makes this operation very easy. The following listing set two cookies in the client's browser.
1 2 3 4 5 6 | @app.route('/set-cookie')
def set_cookie():
res = make_response("Cookie setter")
res.set_cookie("favorite-color", "skyblue")
res.set_cookie("favorite-font", "sans-serif")
return res
|
Note: We are discussing cookies in detail in lesson Cookies in Flask.
The cookies set by the above listing will last until the browser session. We can set the expiration time of cookie by passing number of seconds as a third argument to the set_cookie() method. For example:
1 2 3 4 5 6 | @app.route('/cookie')
def set_cookie():
res = make_response("Cookie setter")
res.set_cookie("favorite-color", "skyblue", 60*60*24*15)
res.set_cookie("favorite-font", "sans-serif", 60*60*24*15)
return res
|
This listing sets the expiration time of the cookies to 15 days.
Creating Response using Tuples #
The last pattern to create response is to use tuples in one of the following formats:
1 2 3 4 5 | (response, status, headers)
(response, headers)
(response, status)
|
The response is a string which represents the body of the response, status is the HTTP status code it can be integer or string and headers is a dictionary containing header values.
1 2 3 | @app.route('/')
def http_500_handler():
return ("<h2>500 Error</h2>", 500)
|
This view function will return HTTP 500 Internal Server Error. Since we can omit parentheses while creating tuples, the above code can also be written as follows:
1 2 3 | @app.route('/')
def http_500_handler():
return "<h2>500 Error</h2>", 500
|
The following listing shows how to set headers using tuples:
1 2 3 | @app.route('/')
def render_markdown():
return "## Heading", 200, {'Content-Type': 'text/markdown'}
|
Can you guess what the following view function does?
1 2 3 | @app.route('/transfer')
def transfer():
return "", 302, {'location': 'http://localhost:5000/login'}
|
This view function redirects the user to http://localhost:5000/login using HTTP 302 response code (a temporary redirect). Redirecting a user to a different page is so common that Flask provides a helper function called redirect() to make the job easier.
1 2 3 4 5 | from flask import Flask, redirect
@app.route('/transfer')
def transfer():
return redirect("http://localhost:5000/login")
|
By default, redirect() performs a HTTP 302 redirect, to perform a HTTP 301 redirect pass the HTTP status code of 301 to the redirect() function as follows:
1 2 3 4 5 | from flask import Flask, redirect
@app.route('/transfer')
def transfer():
return redirect("http://localhost:5000/login", code=301)
|
Hook Points #
In a web application, it is quite common to execute some code before after every request. For example, let's say we want to log the IP address of users who are visiting our application or authenticate a user before displaying hidden pages. Rather than duplicating such code inside every view function (which would be crazy) Flask provides following decorators for such scenarios:
before_first_request: This decorator registers a function to execute before the first request is handled.before_request: This decorator registers a function to execute before a request is handled.after_request: This decorator registers a function to execute after a request is handled. The registered function will not be called in case an unhandled exception occurred in the request handler. The function must accept a response object and return the same or new response.teardown_request: Similar toafter_requestdecorator but the registered function will always execute regardless of whether the request handler throws an exception or not.
Note that if the function registered by before_request decorator returns a response then the request handler will not be called.
The following listing demonstrates how to utilize hooks points in Flask. Create a new file named hooks.py with the code as shown below:
flask_app/hooks.py
1 2 3 4 5 6 7 8 9 10 11 12 13 14 15 16 17 18 19 20 21 22 23 24 25 | from flask import Flask, request, g
app = Flask(__name__)
@app.before_first_request
def before_first_request():
print("before_first_request() called")
@app.before_request
def before_request():
print("before_request() called")
@app.after_request
def after_request(response):
print("after_request() called")
return response
@app.route("/")
def index():
print("index() called")
return '<p>Testings Request Hooks</p>'
if __name__ == "__main__":
app.run(debug=True)
|
Start the server and make your first request by visiting http://localhost:5000/. In the standard output of the shell that runs the server you should get following output:
1 2 3 4 | before_first_request() called
before_request() called
index() called
after_request() called
|
Note: Server request logs are omitted for brevity.
Refresh the page and this time you should get the following output in the shell.
1 2 3 | before_request() called
index() called
after_request() called
|
As this is our second request before_first_request() function is not executed.
Aborting Request using abort() #
Flask provides a function named abort() for terminating a request with a specific error code like 404, 500 and so on. For example:
1 2 3 4 5 6 | from flask import Flask, abort
@app.route('/')
def index():
abort(404)
# code after abort() execution will never be executed
|
This view function will return a generic 404 page that looks like this:
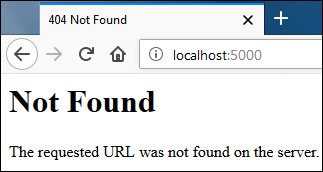
The abort() will display similar pages for other types of errors. If you want to customize the error pages use errorhandler decorator which is discussed next.
Custom Error Pages #
The errorhandler decorator is used to create custom error pages. It accepts a single argument which is the HTTP error code for which you are creating custom error page. Open hooks.py file and create custom error pages for HTTP 404 and HTTP 500 errors using errorhandler decorator as follows (changes are highlighted):
flask_app/hooks.py
1 2 3 4 5 6 7 8 9 10 11 12 13 14 15 16 17 18 19 20 21 22 23 24 | from flask import Flask, request, g, abort
#...
#...
@app.after_request
def after_request(response):
print("after_request() called")
return response
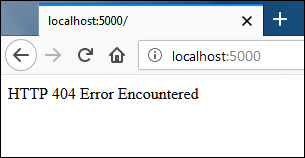
@app.errorhandler(404)
def http_404_handler(error):
return "<p>HTTP 404 Error Encountered</p>", 404
@app.errorhandler(500)
def http_500_handler(error):
return "<p>HTTP 500 Error Encountered</p>", 500
@app.route("/")
def index():
# print("index() called")
# return '<p>Testings Request Hooks</p>'
abort(404)
if __name__ == "__main__":
#...
|
Notice that both error handlers takes a single argument named error which contains additional information about the type of error occurred.
If you now visit the root URL, you will get the following response:
Load Comments