Database Modelling in Flask
Last updated on July 27, 2020
In this lesson, we will learn how to interact with the database. Today we have two types of competing Database systems:
- Relational databases.
- Non-Relational or NoSQL databases.
Relational databases have been used traditionally in web application. Many big players on the web like Facebook are still using it. Relational databases stores data in tables and columns and uses a foreign key to establish a relationship between one or more tables. Relational databases also support transaction which simply means that you can execute a set of SQL statements that needs to be atomic. By atomic I mean either all statements in the transaction executed successfully or nothing executed at all.
In recent years NoSQL databases have grown in popularity. NoSQL databases do not store data in tables and columns instead they use structures like document stores, key-value stores, graphs etc. Most NoSQL also do not support transaction but they do offer lots of speed.
Relational databases are very mature as compared to NoSQL databases. They have proven themselves to be reliable and secure across many industries. Consequently, the rest of this lesson specifically discusses how to use Relational databases with Flask. That doesn't mean NoSQL databases are of no use. In fact, there are some scenarios where NoSQL databases make more sense than a Relational Database but for now, our discussion will be restricted to relational databases only.
SQLAlchemy and Flask-SQLAlchemy #
SQLAlchemy is the de facto framework for working with relational databases in Python. It was created by Mike Bayer in 2005. SQLAlchemy supports databases like MySQL, PostgreSQL, Oracle, MS-SQL, SQLite and so on.
SQLAlchemy comes with a powerful ORM ( Object Relational Mapper ) which allows us to work with various databases using Object Oriented code instead of writing raw SQL. Of course, we are not bound to use ORM in any way, if the need arises then we can use SQL too.
Flask-SQLAlchemy is an extension which integrates SQLAlchemy framework with Flask. In addition to that, it also provides some helper methods to make working with SQLAlchemy a little easier. Install Flask-SQLAlchemy and its dependencies using the following command:
(env) overiq@vm:~/flask_app$ pip install flask-sqlalchemy
To use Flask-SQLAlchemy import SQLAlchemy class from flask_sqlalchemy package and instantiate an SQLAlchemy object by passing an application instance to it. Open main2.py file and modify it as follows (changes are highlighted):
1 2 3 4 5 6 7 8 9 10 11 12 13 | #...
from forms import ContactForm
from flask_sqlalchemy import SQLAlchemy
app = Flask(__name__)
app.debug = True
app.config['SECRET_KEY'] = 'a really really really really long secret key'
manager = Manager(app)
db = SQLAlchemy(app)
class Faker(Command):
#...
|
The SQLAlchemy instance db provides access to all SQLAlchemy functions.
Next, we need to tell Flask-SQLAlchemy the location of the database we want to use as a URI. The format of database URI is as follows:
dialect+driver://username:password@host:port/database
The dialect refers to the name of the database like mysql, mssql, postgresql etc.
The driver refers to the DBAPI to use to connect to the database. By default, SQLAlchemy works only with SQLite without any additional driver. To work with other databases you will have to install a DBAPI compliant driver specific to the database.
So what is DBAPI?
DBAPI is just a standard which defines a common Python API to access databases from different vendors.
The following table lists some databases and it's DBAPI compliant drivers:
| Database | DBAPI Driver |
|---|---|
| MySQL | PyMysql |
| PostgreSQL | Psycopg 2 |
| MS-SQL | pyodbc |
| Oracle | cx_Oracle |
The username and password are optional if specified it will be used to login in into the database.
The host refers to the location of the database server.
The port is the optional database server port.
The database refers to the name of the database.
Here are some examples of database URIs for some popular databases:
1 2 3 4 5 6 7 8 9 10 11 | # database URI for MySQL using PyMysql driver
'mysql+pymysql://root:pass@localhost/my_db'
# database URI for PostgreSQL using psycopg2
'postgresql+psycopg2://root:pass@localhost/my_db'
# database URI for MS-SQL using pyodbc driver
'mssql+pyodbc://root:pass@localhost/my_db'
# database URI for Oracle using cx_Oracle driver
'oracle+cx_oracle://root:pass@localhost/my_db'
|
The format of the database URI for SQLite database is slightly different. Since SQLite is a file based database and doesn't require username and password, in the database URI we only specify the pathname of the database file.
1 2 3 4 5 | # For Unix/Mac we use 4 slashes
sqlite:////absolute/path/to/my_db.db
# For Windows we use 3 slashes
sqlite:///c:/absolute/path/to/mysql.db
|
Flask-SQLAlchemy uses SQLALCHEMY_DATABASE_URI configuration key to specify the database URI. Open main2.py and add SQLALCHEMY_DATABASE_URI configuration key as follows (changes are highlighted):
1 2 3 4 5 6 7 8 9 | #...
app = Flask(__name__)
app.debug = True
app.config['SECRET_KEY'] = 'a really really really really long secret key'
app.config['SQLALCHEMY_DATABASE_URI'] = 'mysql+pymysql://root:pass@localhost/flask_app_db'
manager = Manager(app)
db = SQLAlchemy(app)
#...
|
Throughout this course, we will be using MySQL database. So before moving on to the next section make sure you have a working MySQL installation on your computer.
Creating Models #
A Model is a Python class which represents the database table and its attributes map to the column of the table. A model class inherits from db.Model and defines columns as an instance of db.Column class. Open main2.py file and add the following class below the updating_session() view function:
flask_app/main2.py
1 2 3 4 5 6 7 8 9 10 11 12 13 14 15 16 17 | #...
from flask_sqlalchemy import SQLAlchemy
from datetime import datetime
#...
class Post(db.Model):
__tablename__ = 'posts'
id = db.Column(db.Integer(), primary_key=True)
title = db.Column(db.String(255), nullable=False)
slug = db.Column(db.String(255), nullable=False)
content = db.Column(db.Text(), nullable=False)
created_on = db.Column(db.DateTime(), default=datetime.utcnow)
updated_on = db.Column(db.DateTime(), default=datetime.utcnow, onupdate=datetime.utcnow)
def __repr__(self):
return "<{}:{}>".format(self.id, self.title[:10])
|
Here we are creating a Post model class with 5 class variables. Each class variable except __tablename__ is an instance of db.Column class. The __tablename__ is a special class variable used to define the name of the database table. By default, SQLAlchemy doesn't conform to the convention of creating plural names and creates table name after the model name. If you don't want to rely on this behavior use __tablename__ variable to explicitly name the table.
The first argument to the db.Column() constructor is the type of the column you want to create. SQLAlchemy provides a large number of column types and if that's not enough you can even define your own custom types. The following table lists some generic column types provided by SQLAlchemy and its associated type in Python and SQL.
| SQLAlchemy | Python | SQL |
|---|---|---|
| BigInteger | int |
BIGINT |
| Boolean | bool |
BOOLEAN or SMALLINT |
| Date | datetime.date |
DATE |
| DateTime | datetime.date |
DATETIME |
| Integer | int |
INTEGER |
| Float | float |
FLOAT or REAL |
| Numeric | decimal.Decimal |
NUMERIC |
| Text | str |
TEXT |
We can also set additional constraints on the column by passing them as keyword arguments to the db.Column constructor. The following table lists some commonly used constraints:
| Constraint | Description |
|---|---|
| nullable | When set to False makes the column required. Its default value is True. |
| default | It provides a default value for the column. |
| index | A boolean attribute. If set to True creates an indexed column. |
| onupdate | It provides a default value for the column while updating a record. |
| primary_key | A boolean attribute. If set to True marks the column as the primary key of the table. |
| unique | A boolean attribute. If set to True each value in the column must be unique. |
In lines 16-17, we have defined a __repr__() method. It is not a requirement but when defined provides a string representation of the object.
You might have noticed that we have set the default value of created_on and updated_on to a method name ( datetime.utcnow ) instead of calling the method ( datetime.utcnow() ). This is because we don't want to call datetime.utcnow() method when the code is executed. Instead, we want it to call it when an actual record is added or updated.
Defining Relationship #
In the previous section, we have created a Post model with a couple of fields. In the real world, however, model classes seldom exist on their own. Most of the time they are connected with other models through various relationships like one-to-one, one-to-many and many-to-many.
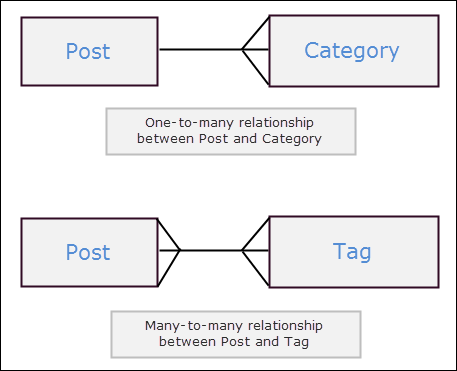
Let's expand on the analogy of a blog site. Generally, a blog post belongs to a category and one or more tags. In other words, there is a one-to-many relationship between a category and a post and a many-to-many relationship between a post and a tag. The following figure demonstrates this relationship.
Open main2.py and add Category and Tag models as follows (changes are highlighted):
flask_app/models.py
1 2 3 4 5 6 7 8 9 10 11 12 13 14 15 16 17 18 19 20 21 22 23 24 25 26 27 28 | #...
def updating_session():
#...
return res
class Category(db.Model):
__tablename__ = 'categories'
id = db.Column(db.Integer(), primary_key=True)
name = db.Column(db.String(255), nullable=False)
slug = db.Column(db.String(255), nullable=False)
created_on = db.Column(db.DateTime(), default=datetime.utcnow)
def __repr__(self):
return "<{}:{}>".format(id, self.name)
class Posts(db.Model):
# ...
class Tag(db.Model):
__tablename__ = 'tags'
id = db.Column(db.Integer(), primary_key=True)
name = db.Column(db.String(255), nullable=False)
slug = db.Column(db.String(255), nullable=False)
created_on = db.Column(db.DateTime(), default=datetime.utcnow)
def __repr__(self):
return "<{}:{}>".format(id, self.name)
#...
|
One to Many Relationship #
A one to many relationships is created by placing a foreign key on the child table. This is the most common type of relationship you will encounter while working with databases. To create one to many relationships in SQLAlchemy, we do the following:
- Create a new
db.Columninstance usingdb.ForeignKeyconstraint in the child class. - Define a new property using
db.relationshipdirective in the parent class. This property will be used to access related objects.
Open main2.py and modify Post and Category model as follows (changes are highlighted):
flask_app/models.py
1 2 3 4 5 6 7 8 9 10 11 | #...
class Category(db.Model):
# ...
created_on = db.Column(db.DateTime(), default=datetime.utcnow)
posts = db.relationship('Post', backref='category')
class Post(db.Model):
# ...
updated_on = db.Column(db.DateTime(), default=datetime.utcnow, onupdate=datetime.utcnow)
category_id = db.Column(db.Integer(), db.ForeignKey('categories.id'))
#...
|
Here we have added two new attributes posts and category_id to the Category and Post model respectively.
The db.ForeignKey() accepts the name of the column on which you what to define the foreign key. Here we are passing categories.id to the db.ForeignKey(), it means that the category_id attribute of the Post model can only take values from the id column of the categories table.
Next we have posts attribute in the Category model defined using db.relationship() directive. The db.relationship() is used add to bidirectional relationship. In other words, it adds an attribute on the model class to access related objects. At its simplest, it accepts at least one positional argument which is the name of the class on the other side of the relationship.
1 2 3 | class Category(db.Model):
# ...
posts = db.relationship('Post')
|
Now if we have a Category object (say c) then we can access all posts under it as c.posts. What if you want to access the data from the other side of the relationship i.e get category from a post object? This is where backref comes into play. So the code:
posts = db.relationship('Post', backref='category')
adds a category attribute to the Post object. That means if we have a Post object (say p) then we can access its category as p.category.
The category and posts attributes on Post and Category object only exist for your convenience they are not actual columns in the table.
Note that unlike attribute representing foreign key (which must be defined on the many side of the relationship) you can define db.relationship() on any side of the relationship.
One to One relationship #
Establishing a one-to-one relationship in SQLAlchemy is almost the same as one-to-many relationship, the only difference is that we pass an additional argument uselist=False to the db.relationship() directive. Here is an example:
1 2 3 4 5 6 7 8 9 10 11 12 13 14 15 | class Employee(db.Model):
__tablename__ = 'employees'
id = db.Column(db.Integer(), primary_key=True)
name = db.Column(db.String(255), nullable=False)
designation = db.Column(db.String(255), nullable=False)
doj = db.Column(db.Date(), nullable=False)
dl = db.relationship('DriverLicense', backref='employee', uselist=False)
class DriverLicense(db.Model):
__tablename__ = 'driverlicense'
id = db.Column(db.Integer(), primary_key=True)
license_number = db.Column(db.String(255), nullable=False)
renewed_on = db.Column(db.Date(), nullable=False)
expiry_date = db.Column(db.Date(), nullable=False)
employee_id = db.Column(db.Integer(), db.ForeignKey('employees.id')) # Foreign key
|
Note: In these classes, we are assuming that an employee can't have more than one driver license. So the relationship between an employee and driver license is one-to-one.
Now if we have an Employee object e then e.dl would return a DriverLicense object. If we hadn't passed uselist=False to the db.relationship() directive then the relationship between Employee and DriverLicense would be one-to-many and e.dl would return a list of DriverLicense objects instead of a single object. The uselist=False argument doesn't have any effect on the employee attribute of the DriverLicense object. As usual, it will return a single object.
Many to Many Relationship #
A many-to-many relationship requires an extra table know as association table. Consider the example of a blog site:
A blog post is usually associated with one or more tags. Similarly, a tag is also associated with one or more posts. So there is a many-to-many relationship between posts and tags. Adding a foreign key referencing post ids in the tags table is not enough because a tag can have one or more posts.
The solution is to create a new table called association table by defining 2 foreign keys referencing post.id and tag.id columns.
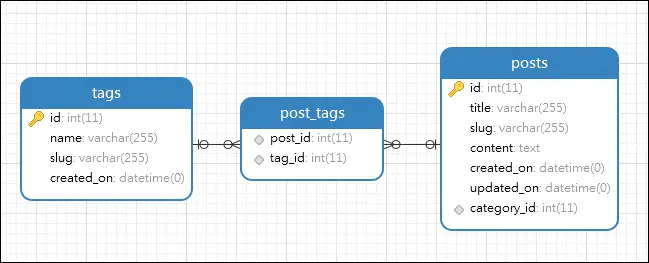
As you can see in the image, a many-to-many relationship between the post and tags is implemented as a two one-to-many relationship. The first one-to-one relationship is between posts and post_tags table and the second is between tags and post_tags table. The following code shows how to create a many-to-many relationship in SQLAlchemy. Open main2.py file and add the following code (changes are highlighted).
flask_app/main2.py
1 2 3 4 5 6 7 8 9 10 11 12 13 14 15 16 17 18 19 | # ...
class Category(db.Model):
# ...
def __repr__(self):
return "<{}:{}>".format(id, self.name)
post_tags = db.Table('post_tags',
db.Column('post_id', db.Integer, db.ForeignKey('posts.id')),
db.Column('tag_id', db.Integer, db.ForeignKey('tags.id'))
)
class Post(db.Model):
# ...
class Tag(db.Model):
# ...
created_on = db.Column(db.DateTime(), default=datetime.utcnow)
posts = db.relationship('Post', secondary=post_tags, backref='tags')
#...
|
In lines 7-10, we are defining an association table as an object of db.Table(). The first argument to db.Table() is the name of the table and additional arguments are the columns which are represented by instances of db.Column(). The syntax of creation association table may appear slightly odd as compared to the model class. This is because the association table is created using SQLAlchemy Core, which is another facet of SQLAlchemy. To learn more about SQLAlchemy visit our SQLAlchemy tutorial.
Next, we have to tell our model class the association table we want to use. That's the job of secondary keyword argument. In line 18, we are calling db.relationship() with the secondary argument set to post_tags. Although we have defined the relationship in the Tag model, we could just as easily defined it in the Post model.
Let's say we have a Post object p, then we can access all its tags as p.tags. Similarly, Given a Tag object t, we can access all the posts under it as t.posts.
Now its time to create our database and tables inside it.
Creating Tables #
To follow along with the rest of the lesson, you should have a working MySQL installation. If you don't, click here to learn how to install MySQL.
Recall that SQLAlchemy by default only works with the SQLite database. To work with other databases, we have to install a DBAPI compliant driver. As we are using MySQL, we will install PyMySql driver.
(env) overiq@vm:~/flask_app$ pip install pymysql
Next login to MySQL server and create a database named flask_app_db using the following command:
1 2 3 4 5 6 7 8 | (env) overiq@vm:~/flask_app$ mysql -u root -p
mysql>
mysql> CREATE DATABASE flask_app_db CHARACTER SET utf8mb4 COLLATE utf8mb4_unicode_ci;
Query OK, 1 row affected (0.26 sec)
mysql> \q
Bye
(env) overiq@vm:~/flask_app$
|
This command creates flask_app_db database with full Unicode support.
To create the necessary tables from models invoke create_all() method of the SQLAlchemy object (db). Start the Python shell and enter the following command:
1 2 3 4 5 6 | (env) overiq@vm:~/flask_app$ python main2.py shell
>>>
>>> from main2 import db
>>>
>>> db.create_all()
>>>
|
The create_all() method only creates table if it doesn't already exist in the database. So you can run it safely multiple times. In addition to that, the create_all() method doesn't take account of the modifications made to the models while creating tables. This means that once a table is created in the database, running create_all() method after modifying its model will not alter the table schema. To do that, we use a migration tool like Alembic. We will learn how to perform database migration using Alembic in lesson Database Migrations with Alembic.
To view the tables created login to MySQL server and execute the following command:
1 2 3 4 5 6 7 8 9 10 11 12 13 14 15 16 | mysql>
mysql> use flask_app_db
Database changed
mysql>
mysql> show tables;
+------------------------+
| Tables_in_flask_app_db |
+------------------------+
| categories |
| post_tags |
| posts |
| tags |
+------------------------+
4 rows in set (0.02 sec)
mysql>
|
Another way to view the tables is to use a Database Administration tool like HeidiSQL. HeidiSQL is a cross-platform open source software for administering MySQL, MS-SQL, and PostgreSQL. It allows us to browse data, edit data, view schema, alter table and much more without writing a single line of SQL. You can download HeidiSQL from here.
Once installed open flask_app_db database in HeidiSQL and you will be displayed a list of tables like this:
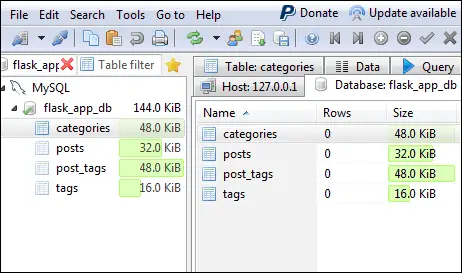
The flask_app_db database now has 4 tables in it. Tables namely categories, posts and tags are created directly from models and table post_tags is an association table which represents a many-to-many relationship between Post and Tag model.
The SQLAlchemy class also defines a method called drop_all() to delete all the tables from the database. Remember that drop_all() doesn't care whether tables contain any data or not. It will delete all the data and tables right away, so use it sparingly.
We now have all the tables in place. Let's enter some data into them.
Load Comments