Pygments Tutorial
Last updated on July 27, 2020
Pygments is a very popular and robust Python package to highlight code snippets. Many well-known sites like Wikipedia, BitBucket, Read the Docs etc. are using it. Here are some of the features of Pygments:
- Supports a wide range of languages and markup formats.
- New language and markup can be added easily.
- Can use used as library or command line utility
- A number of output formats are available, like HTML, RTF, Latex etc.
To install Pygments enter the following command:
$ pip install pygments
Highlighting using Pygments #
To highlight a code snippet using Pygments we follow these steps:
- Select lexer.
- Select the output format.
- Call the
highlight()function.
Let's go through each step in detail.
Selecting the lexer #
A lexer is a program which performs the lexical analysis. In other words, it splits the code into tokens (identifier, keyword, literal etc). Every language or markup has its own lexer. To select the lexer use get_lexer_by_name() function from the pygments.lexers package. It takes a single argument named alias which is name of the lexer. For example, to select the lexer for Python do this:
1 2 3 4 5 6 7 | >>>
>>> from pygments import lexers
>>>
>>> lexers.get_lexer_by_name("python")
<pygments.lexers.PythonLexer>
>>>
>>>
|
We can see all the available lexers using the get_all_lexers() function:
1 2 3 4 5 6 7 | >>>
>>> list(lexers.get_all_lexers())
[('Transact-SQL', ('tsql', 't-sql'), ('*.sql',), ('text/x-tsql',)), ('Termcap', ('termcap',), ('termcap', 'termcap.src'), ()), ('Snowball', ('snowball',), ('*.sbl',), ()), ('Elm', ('elm',), ('*.elm',), ('text/x-elm',)), ('IRC logs', ('irc',), ('*.weechatlog',), ('text/
...
('pycon',), (), ('text/x-python-doctest',)), ('BBCode', ('bbcode',), (), ('text/x-bbcode',))]
>>>
>>>
|
Selecting the Formatter #
Once you have selected the lexer, the next step is to select the Formatter. The Formatter's job is to take a token stream from the lexer and writes the output, in the format such as HTML, LaTex, RTF, BBCode etc. To see the available formats use the get_all_formatters() function from the pygments.formatters package.
1 2 3 4 5 6 7 8 9 10 11 12 13 | >>>
>>> from pygments.formatters import get_all_formatters
>>>
>>> list(get_all_formatters())
[<class 'pygments.formatters.img.JpgImageFormatter'>,
<class 'pygments.formatters.rtf.RtfFormatter'>,
...
<class 'pygments.formatters.svg.SvgFormatter'>,
<class 'pygments.formatters.html.HtmlFormatter'>,
<class 'pygments.formatters.irc.IRCFormatter'>,
<class 'pygments.formatters.img.BmpImageFormatter'>]
>>>
>>>
|
In our case, we are interested in outputting code snippet in HTML. As a result, we will use, HtmlFormatter (third from the last in preceding output). To use HtmlFormatter, import it from pygments.formatters and then instantiate it as follows:
1 2 3 4 5 | >>>
>>> from pygments.formatters import HtmlFormatter
>>>
>>> formatter = HtmlFormatter()
>>>
|
Highlighting Code #
Finally, the last step is to call the highlight() function from the pygments package. The highlight() function puts everything together and returns the highlighted output. It takes three arguments, the code to highlight, lexer and the formatter.
1 2 3 4 5 6 7 8 9 10 11 12 13 14 15 | >>>
>>> from pygments import highlight
>>>
>>> code = """\
... def func():
... # function body
... print("hello world!")
... """
>>>
>>> lex = lexers.get_lexer_by_name("python")
>>>
>>> highlight(code, lex, formatter)
'<div class="highlight"><pre><span></span><span class="k">def</span> <span class="nf">func</span><span class="p">():</span>\n\t<span class="c1"># function body</span>\n\t<span class="k">print</span><span class="p">(</span><span class="s2">"hello world!"</span><span class="p">)</span>\n</pre></div>\n'
>>>
>>>
|
If you want highlight() function to save the output to a file rather than returning it, use the outfile argument as follows:
1 2 3 4 5 | >>>
>>> with open("out.html", "w") as f:
>>> highlight(code, lex, formatter, outfile=f)
>>>
>>>
|
This will create a file named out.html in the current working directory containing the highlighted code.
If open out.html in a browser you will find that code doesn't appear to be highlighted at all. This is because by default HtmlFormatter generates HTML with CSS classes to marks various tokens, but it doesn't generate the actual CSS styles. We will see how to fix this in the next section.
Customizing the Output of HtmlFormatter #
The following is a lists of some common keyword arguments that you can pass to HtmlFormatter() function to customize the generated output:
| Argument | Description |
|---|---|
full |
If set to True, HtmlFormatter generates a self-contained document with inline CSS styles. By default, it is set to False |
style |
The color scheme to use. It defaults to default. |
linenos |
If set to True, tells the formatter to generate output with line numbers. By default, it is set to False. |
hl_lines |
Specify the list of lines to be highlighted. |
cssclass |
CSS class for wrapping the code block. |
Here is how to use these arguments:
full #
In the previous section we have seen that by default, the output generated by HtmlFormatter() only contains HTML markup and CSS classes only, it doesn't contain the actual CSS styles to format the HTML markup. We can alter this behavior by passing full=True to HtmlFormatter() as follows:
1 2 3 4 5 6 7 | >>>
>>> formatter = HtmlFormatter(full=True)
>>>
>>> with open("out.html", "w") as f:
>>>     highlight(code, lex, formatter, outfile=f)
>>>
>>>
|
This will re-write the existing out.html file. If you now open out.html in a text editor you will find that in addition to HTML markup and CSS classes, it also contains a list of CSS style in the head section of the document.
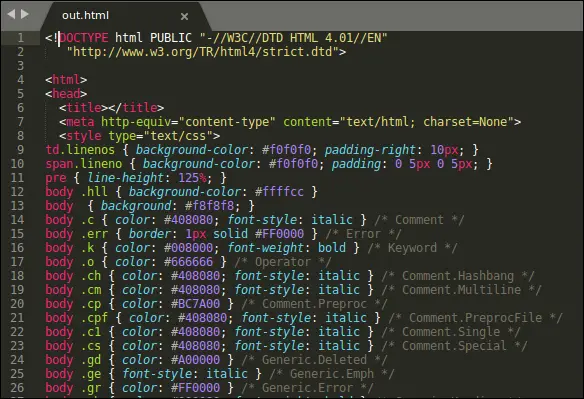
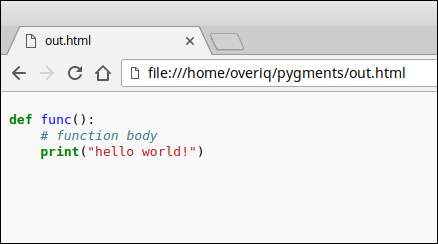
Open out.html in your browser and it should look like this:
style #
The HtmlFormatter uses a default color scheme named default to highlight the code. Pygments comes with several built-in styles. To view the built-in styles use get_all_styles() function of the pygments.styles package.
1 2 3 4 5 6 7 8 9 10 | >>>
>>> from pygments.styles import get_all_styles
>>>
>>> list(get_all_styles())
['borland', 'xcode', 'pastie', 'emacs', 'vim', 'rainbow_dash', 'igor',
'algol', 'murphy', 'native', 'lovelace', 'algol_nu', 'rrt', 'arduino',
'paraiso-dark', 'trac', 'fruity', 'colorful', 'friendly', 'vs', 'perldoc',
'autumn', 'monokai', 'abap', 'default', 'paraiso-light', 'tango', 'bw', 'manni']
>>>
>>>
|
Note: To get an instant preview of the available styles visit http://pygments.org/demo.
Once you know the style you want to use set it using the style argument as follows:
1 2 3 4 5 6 7 8 | >>>
>>> formatter = HtmlFormatter(full=True, style='monokai')
>>>
>>> with open("out.html", "w") as f:
... highlight(code, lex, formatter, outfile=f)
...
>>>
>>>
|
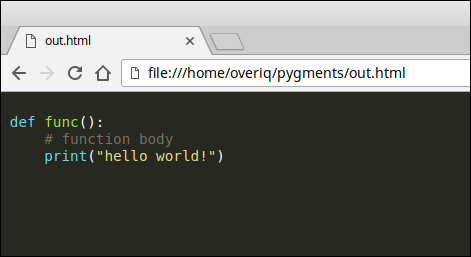
This will highlight the code snippet using monokai color scheme.
Open out.html and it will look like this:
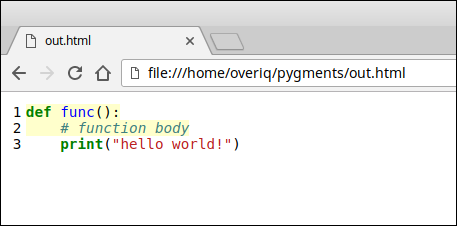
linenos #
1 2 3 4 5 6 7 | >>>
>>> formatter = HtmlFormatter(full=True, linenos=True)
>>>
>>> with open("out.html", "w") as f:
... highlight(code, lex, formatter, outfile=f)
...
>>>
|
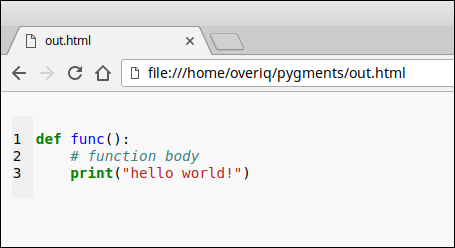
This will add line numbers to the highlighted code:
Open out.html and it will look like this:
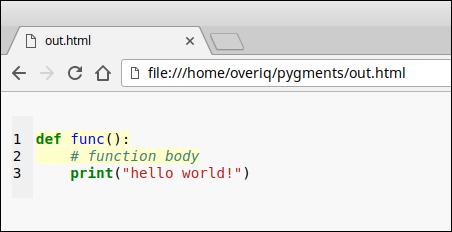
hl_lines #
1 2 3 4 5 6 7 | >>>
>>> formatter = HtmlFormatter(full=True, linenos=True, hl_lines=[1,2])
>>>
>>> with open("out.html", "w") as f:
... highlight(code, lex, formatter, outfile=f)
...
>>>
|
This will highlight the first and second line of the code.
Open out.html and it will look like this:
cssclass #
By default, HtmlFormatter() generates code block wrapped in <div> tag with
class="highlight". For example:
1 2 3 4 5 | >>> formatter = HtmlFormatter()
>>>
>>> highlight(code, lex, formatter)
'<div class="highlight"><pre><span></span><span class="k">def</span> <span class="nf">func</span><span class="p">():</span>\n\t<span class="c1"># function body</span>\n\t<span class="k">print</span><span class="p">(</span><span class="s2">"hello world!"</span><span class="p">)</span>\n</pre></div>\n'
>>>
|
We can specify any other class name using cssclass argument.
1 2 3 4 5 6 7 | >>>
>>> formatter = HtmlFormatter(cssclass="code-block")
>>>
>>> highlight(code, lex, formatter)
'<div class="code-block"><pre><span></span><span class="k">def</span> <span class="nf">func</span><span class="p">():</span>\n\t<span class="c1"># function body</span>\n\t<span class="k">print</span><span class="p">(</span><span class="s2">"hello world!"</span><span class="p">)</span>\n</pre></div>\n'
>>>
>>>
|
This returns the code block wrapped in <div> with class="code-block".
Generating CSS #
We have seen that passing full=True to HtmlFormatter() creates a self-contained document with CSS styles. Although, this approach works, but it generates a lot of redundant CSS styles. A better approach would be to create an external style sheet containing all the CSS classes used in the output.
We can use get_style_defs() method of HtmlFormatter() to get the style definitions used by the formatter as a string.
1 2 3 4 5 6 7 8 9 10 11 12 13 14 15 16 17 18 19 20 | >>>
>>> formatter = HtmlFormatter()
>>>
>>> print(formatter.get_style_defs())
.hll { background-color: #ffffcc }
.c { color: #408080; font-style: italic } /* Comment */
.err { border: 1px solid #FF0000 } /* Error */
.k { color: #008000; font-weight: bold } /* Keyword */
.o { color: #666666 } /* Operator */
.ch { color: #408080; font-style: italic } /* Comment.Hashbang */
.cm { color: #408080; font-style: italic } /* Comment.Multiline */
/* ... */
.bp { color: #008000 } /* Name.Builtin.Pseudo */
.fm { color: #0000FF } /* Name.Function.Magic */
.vc { color: #19177C } /* Name.Variable.Class */
.vg { color: #19177C } /* Name.Variable.Global */
.vi { color: #19177C } /* Name.Variable.Instance */
.vm { color: #19177C } /* Name.Variable.Magic */
.il { color: #666666 } /* Literal.Number.Integer.Long */
>>>
|
This returns CSS styles for the default style.
To get the CSS styles for monokai, do this:
1 2 3 4 5 6 7 8 9 10 11 12 13 14 15 16 17 | >>>
>>> formatter = HtmlFormatter(style='monokai')
>>>
>>> print(formatter.get_style_defs())
.hll { background-color: #49483e }
.c { color: #75715e } /* Comment */
.err { color: #960050; background-color: #1e0010 } /* Error */
.k { color: #66d9ef } /* Keyword */
.l { color: #ae81ff } /* Literal */
/* ... */
.bp { color: #f8f8f2 } /* Name.Builtin.Pseudo */
.fm { color: #a6e22e } /* Name.Function.Magic */
.vc { color: #f8f8f2 } /* Name.Variable.Class */
.vg { color: #f8f8f2 } /* Name.Variable.Global */
.vi { color: #f8f8f2 } /* Name.Variable.Instance */
.vm { color: #f8f8f2 } /* Name.Variable.Magic */
.il { color: #ae81ff } /* Literal.Number.Integer.Long */
|
We can also pass additional classes to get_style_defs() method that will be prepended to the class. For example:
1 2 3 4 5 6 7 8 9 10 11 12 13 14 15 16 17 | >>>
>>> print(formatter.get_style_defs('.highlight'))
.highlight .hll { background-color: #ffffcc }
.highlight { background: #f8f8f8; }
.highlight .c { color: #408080; font-style: italic } /* Comment */
.highlight .err { border: 1px solid #FF0000 } /* Error */
.highlight .k { color: #008000; font-weight: bold } /* Keyword */
.highlight .o { color: #666666 } /* Operator */
/* ... */
.highlight .bp { color: #008000 } /* Name.Builtin.Pseudo */
.highlight .fm { color: #0000FF } /* Name.Function.Magic */
.highlight .vc { color: #19177C } /* Name.Variable.Class */
.highlight .vg { color: #19177C } /* Name.Variable.Global */
.highlight .vi { color: #19177C } /* Name.Variable.Instance */
.highlight .vm { color: #19177C } /* Name.Variable.Magic */
.highlight .il { color: #666666 } /* Literal.Number.Integer.Long */
>>>
|
In case you have specified cssclass argument while creating HtmlFormatter instance then the default selector for get_style_defs() will be this class. For example:
1 2 3 4 5 6 7 8 9 10 11 12 13 14 15 16 17 18 19 | >>>
>>> formatter = HtmlFormatter(cssclass="code-block")
>>>
>>> print(formatter.get_style_defs())
.code-block .hll { background-color: #ffffcc }
.code-block { background: #f8f8f8; }
.code-block .c { color: #408080; font-style: italic } /* Comment */
.code-block .err { border: 1px solid #FF0000 } /* Error */
.code-block .k { color: #008000; font-weight: bold } /* Keyword */
.code-block .o { color: #666666 } /* Operator */
/* ... */
.code-block .bp { color: #008000 } /* Name.Builtin.Pseudo */
.code-block .fm { color: #0000FF } /* Name.Function.Magic */
.code-block .vc { color: #19177C } /* Name.Variable.Class */
.code-block .vg { color: #19177C } /* Name.Variable.Global */
.code-block .vi { color: #19177C } /* Name.Variable.Instance */
.code-block .vm { color: #19177C } /* Name.Variable.Magic */
.code-block .il { color: #666666 } /* Literal.Number.Integer.Long */
>>>
|
And here is how you can save the generated CSS styles to an external file:
1 2 3 4 5 6 7 8 9 10 11 12 13 | >>>
>>> formatter = HtmlFormatter(linenos=True, hl_lines=[1,2], css="code-snippet")
>>>
>>>
>>> with open("out.html", "w") as f:
... highlight(code, lex, formatter, outfile=f)
...
>>>
>>> with open("style.css", "w") as f:
... f.write(formatter.get_style_defs())
...
3583
>>>
|
Now open out.html file in a text editor and add the following line at the top of the it:
<link rel="stylesheet" type="text/css" href="style.css">
Open out.html in a browser and it will look like this:
Another way to create CSS styles is to use pygments as a command line tool. For example:
$ pygmentize -S default -f html > default.css
This command will create the CSS styles for the default style. The -S option specifies the style and -f option specifies the formatter.
To generate CSS styles for monokai, use this:
$ pygmentize -S monokai -f html > monokai.css
We can also specify the top-level class using -a option:
$ pygmentize -S default -f html -a .code-snippet > default.css
Load Comments