Displaying Forms in Django
Last updated on July 27, 2020
So far we have been using Django Shell to demonstrate how the forms work. In this lesson, we will learn how to display forms in our templates.
Note: Before following along, if you have a running instance of Django Shell kill it and restart it again using python manage.py shell command.
Django provides the following three methods to display form elements:
1 2 | >>> from blog.forms import AuthorForm
>>> f = AuthorForm()
|
| Form Method | Code in template | Rendered HTML |
|---|---|---|
as_p() |
{{ f.as_p }} |
<p><label for="id_name">Author Name:</label><input id="id_name" maxlength="50" name="name" type="text" required /></p><p><label for="id_username">Username:</label><input id="id_username" maxlength="50" name="username" type="text" required /></p><p><label for="id_email">Email:</label><input id="id_email" maxlength="254" name="email" type="email" required /></p><p><label for="id_active">Active:</label><input id="id_active" name="active" type="checkbox" /></p> |
as_table() |
{{f.as_table}} |
<tr><th><label for="id_name">Author Name:</label></th><td><input id="id_name" maxlength="50" name="name" type="text" required /></td></tr><tr><th><label for="id_email">Email:</label></th><td><input id="id_email" maxlength="254" name="email" type="email" required /></td></tr><tr><th><label for="id_active">Active:</label></th><td><input id="id_active" name="active" type="checkbox" /></td></tr> |
as_ul() |
{{ f.as_ul }} |
<li><label for="id_name">Author Name:</label><input id="id_name" maxlength="50" name="name" type="text" required /></li><li><label for="id_email">Email:</label><input id="id_email" maxlength="254" name="email" type="email" required /></li><li><label for="id_active">Active:</label><input id="id_active" name="active" type="checkbox" /></li> |
Notice that rendered HTML don't have <form> tag and the submit button. These methods only output form fields only. Why? Because just outputting form fields makes it easier to have multiple forms in the template. To make forms fully functional, we have to manually add <form> tag and submit button like this:
1 2 3 4 | <form action="/url-to-submit/" method="post">
{{ form.as_p }}
<input type="submit" value="Submit" />
</form>
|
We can also output form fields in the template by just typing {{ f }}, which is equivalent to {{ f.as_table }}.
1 2 3 4 | <form action="/url-to-submit/" method="post">
{{ f }}
<input type="submit" value="Submit" />
</form>
|
In addition to outputting form fields, in bound state of the form, these methods also output validation errors.
1 2 3 4 5 6 7 8 9 10 11 12 13 14 15 16 17 18 19 20 | >>>
>>> f2 = AuthorForm()
>>>
>>> f2.is_bound
False
>>>
>>> print(f2.as_p())
<p>
<label for="id_name">Author Name:</label>
<input id="id_name" maxlength="50" name="name" type="text" required />
</p>
<p>
<label for="id_email">Email:</label>
<input id="id_email" maxlength="254" name="email" type="email" required />
</p>
<p>
<label for="id_active">Active:</label>
<input id="id_active" name="active" type="checkbox" />
</p>
>>>
|
Let's bind the form f2 with some data.
1 2 3 4 5 6 7 8 9 10 11 12 13 14 15 16 17 18 19 20 21 22 23 24 25 26 27 28 29 30 31 32 33 34 35 36 37 | >>>
>>> data = {
... 'name': 'author',
... 'active': True,
... }
>>>
>>>
>>> f2 = AuthorForm(data)
>>>
>>>
>>> f2.is_bound
True
>>>
>>> f2.is_valid()
False
>>>
>>> print(f2.as_p())
<ul class="errorlist">
<li>Author name can't be 'admin/author'</li>
</ul>
<p>
<label for="id_name">Author Name:</label>
<input id="id_name" maxlength="50" name="name" type="text" value="author" required />
</p>
<ul class="errorlist">
<li>This field is required.</li>
</ul>
<p>
<label for="id_email">Email:</label>
<input id="id_email" maxlength="254" name="email" type="email" required />
</p>
<p>
<label for="id_active">Active:</label>
<input checked="checked" id="id_active" name="active" type="checkbox" />
</p>
>>>
>>>
|
Notice how Django shows error using unordered list just above the field to which it belongs.
Creating Custom Admin Panel - cadmin #
Templates we will be creating in the upcoming section belongs to a new app called cadmin. The cadmin is a custom admin panel just like Django Admin. The administrators or authors of our site will use this admin panel to manage their content. Just as Django admin, cadmin will be a separate app. However, it will use models from our blog app. Before we do anything else, let's create cadmin app.
Open the terminal or command prompt and enter the following command to create cadmin app.
(env) C:\Users\Q\TGDB\django_project>python manage.py startapp cadminInform our Django project about the existence of cadmin app by adding it into the INSTALLED_APP list in settings.py file. Open settings.py file in TGDB/django_project/django_project add "cadmin" to the INSTALLED_APP as follows:
TGDB/django_project/django_project/settings.py
1 2 3 4 5 6 7 8 9 10 | INSTALLED_APPS = [
'django.contrib.admin',
'django.contrib.auth',
'django.contrib.contenttypes',
'django.contrib.sessions',
'django.contrib.messages',
'django.contrib.staticfiles',
'blog',
'cadmin'
]
|
Create a urls.py file for the cadmin app and add the following code to it:
TGDB/django_project/cadmin/urls.py
1 2 3 4 5 6 | from django.conf.urls import url, include
from . import views
urlpatterns = [
url(r'^post/add/$', views.post_add, name='post_add'),
]
|
Now we need to add this URLConf to the sitewide urls.py.
Open sitewide urls.py file located in TGDB/django_project/django_project and add url(r'^cadmin/', include('cadmin.urls')), to the end of the urlpatterns list as follows:
TGDB/django_project/django_project/urls.py
1 2 3 4 5 6 | #...
urlpatterns = [
url(r'', include('blog.urls')),
url(r'^admin/', admin.site.urls),
url(r'^cadmin/', include('cadmin.urls')),
]
|
Creating base template for cadmin app #
Create a new directory called templates in the cadmin app. Inside the templates directory create another directory called cadmin.
Next, create a new template called base.html inside the cadmin/templates/cadmin directory and add the following code to it:
TGDB/django_project/cadmin/templates/cadmin/base.html
1 2 3 4 5 6 7 8 9 10 11 12 13 14 15 16 17 18 19 20 21 | <!DOCTYPE html>
<html lang="en">
<head>
<meta charset="UTF-8">
<meta name="viewport" content="width=device-width, initial-scale=1.0">
<title>{% block title %}The Great Django Blog :: Admin Panel{% endblock %}</title>
</head>
<body>
{% block content %}
{% endblock %}
<div class="footer">
<div class="section-inner clearfix">
<p>© The Great Django Blog</p>
</div>
</div>
</body>
</html>
|
Create another file called base_admin.html and add the following code to it:
TGDB/django_project/cadmin/templates/cadmin/base_admin.html
1 2 3 4 5 6 7 8 9 10 11 12 13 14 15 16 17 18 19 20 21 22 23 24 25 26 27 28 29 30 31 32 33 34 35 36 | {% extends "cadmin/base.html" %}
{% block content %}
<div class="header">
<div class="section-inner clearfix">
<h2 class="title"><a href="{% url 'post_list' %}">The Great Django Blog - Admin Panel</a></h2>
<div class="user-welcome">
<p>Welcome {{ request.user.username }}</p>
</div>
</div>
</div>
<div class="content">
<div class="section-inner">
<div class="sidebar">
<ul>
<li><a href="{% url 'post_list' %}">Post</a></li>
<li><a href="">Category</a></li>
<li><a href="">Tag</a></li>
<li><a href="">Account Info</a></li>
<li><a href="">Change Password</a></li>
<li><a target="_blank" href="">View Site</a></li>
<li><a href="">Logout</a></li>
</ul>
</div>
{% block main %}
{% endblock %}
</div>
</div>
{% endblock %}
|
Here we are creating two base templates: base.html and base_admin.html. The base_admin.html inherits from base.html. So Why two base templates? Because we have two layouts one for the login and logout page and the second one for inner pages of the admin site. In other words, login.html and logout.html will inherit from base.html, while all the inner pages of the cadmin app will inherit from base_admin.html.
Create a new file called post_add.html with the following code:
TGDB/django_project/cadmin/templates/cadmin/post_add.html
1 2 3 4 5 6 7 8 9 10 11 12 13 14 15 16 17 18 19 20 21 22 23 24 25 26 27 28 | {% extends "cadmin/base_admin.html" %}
{% block title %}
Add New Post - {{ block.super }}
{% endblock %}
{% block main %}
<div class="main">
<p>» <a href="">All Posts</a> » Add Post</p>
<h3>Add Post</h3>
<form action="" method="post">
{% csrf_token %}
<table>
{{ form.as_table }}
<tr>
<td></td>
<td><input type="submit"></td>
</tr>
</table>
</form>
</div>
{% endblock %}
|
Nothing new here, except the {% csrf_token %}. The csrf_token is a special tag which Django uses to prevent CSRF (Cross-Site Request Forgery) attacks. You don't need to know how it works internally, just put {% csrf_token %} in your form templates and Django will take care of everything else. If you are interested in learning more about CSRF attacks click here.
By default, Django expects you to add csrf_token tag on every form. If you don't do so, then on submitting the form you would get an HTTP 403 FORBIDDEN error like this:
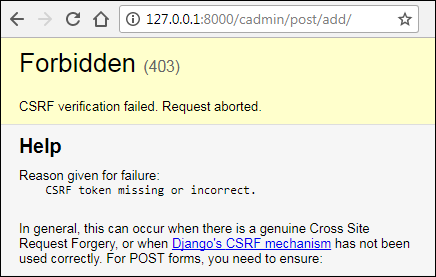
Let's now add a view function to allows users to create new post. Open views.py from cadmin app add post_add() view function as follows:
TGDB/django_project/cadmin/views.py
1 2 3 4 5 6 7 8 9 10 11 12 13 14 15 16 17 18 19 20 21 22 23 24 25 26 | from django.shortcuts import render, redirect
from blog.forms import PostForm
# Create your views here.
def post_add(request):
# If request is POST, create a bound form (form with data)
if request.method == "POST":
f = PostForm(request.POST)
# check whether form is valid or not
# if the form is valid, save the data to the database
# and redirect the user back to the add post form
# If form is invalid show form with errors again
if f.is_valid():
# save data
f.save()
return redirect('post_add')
# if request is GET the show unbound form to the user
else:
f = PostForm()
return render(request, 'cadmin/post_add.html', {'form': f})
|
Here is how it works:
If the request is coming using GET method, then create an unbound form object (line 25) and return the response to the user (line 26).
If the request is coming using POST method, bind the form with the data by passing request.POST to the PostForm() (line 11). Then validate the form using is_valid() method (line 18). If form data is valid, save the category to the database (line 20) and redirect the user back to URL named post_add (line 21). On the other hand, if validation failed, control comes out of the if-else statement and returns a new response containing form data as well as validation errors. This time form is bound with data so that the form can be pre-populated with field data that was filled in the previous request.
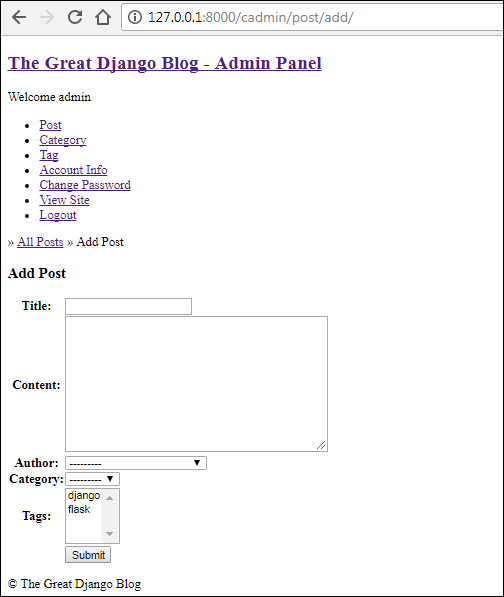
To view the fruits of our labor visit http://127.0.0.1:8000/cadmin/post/add/ and you will get a page like this:
Let's try creating a post. In the Add Post form, enter data in all the fields except title and content, then submit the form. You should get validation errors like this:
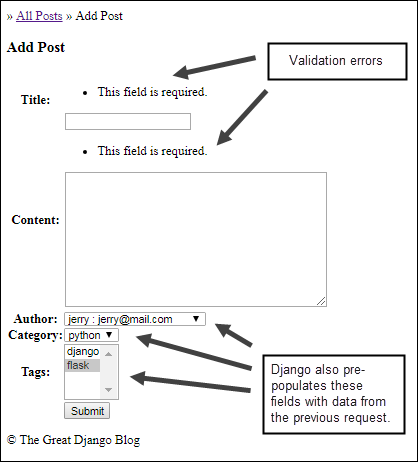
Notice the validation errors above the title and content field. Django also pre-populates author, category and tags fields with data from the previous request.
Enter some data in the title and content field and submit the form again. This time you should get an empty form without any validation errors or pre-populated data. It means our post is successfully saved into the database.
Flash Message #
A web application is all about user experience. After every action, you must notify the user about the result of the operation. These notifications are also commonly known as Flash Messages. Django provides a built-in framework named django.contrib.messages to display flash messages. The django.contrib.messages framework already comes preinstalled so you don't have to configure anything to use it.
To display flash messages we have to first import messages package from the django.contrib package.
from django.contrib import messages
The messages package provides function named add_message() to set flash messages. The add_message() function accepts two arguments, the request object and the message you want to display. Here is an example:
1 2 | from django.contrib import messages
messages.add_message(request, 'Email Sent!')
|
We can also pass message levels to the add_message(). The message levels allow us to format the flash message in the template. The following table lists built-in messages levels, which can be imported from django.contrib.messages package.
| Constant | Description |
|---|---|
DEBUG |
It is used to display development related messages. |
INFO |
It is used to display informational messages. |
SUCCESS |
It is used to display success related messages. |
WARNING |
It is used to display warning related messages. |
ERROR |
It is used to display error related messages. |
Here are some examples:
1 2 3 4 5 6 7 | from django.contrib import messages
messages.add_message(request, messages.DEBUG, '10 queries executed.')
messages.add_message(request, messages.INFO, 'Change your are loggedin as staff member.')
messages.add_message(request, messages.SUCCESS, 'You're logged in.')
messages.add_message(request, messages.WARNING, 'Change you password.')
messages.add_message(request, messages.ERROR, 'Failed to upate profile.')
|
Accessing Flash Messages #
To access flash messages in the templates, we use the messages variable as follows:
1 2 3 4 5 6 7 | {% if messages %}
<ul class="messages">
{% for message in messages %}
<li{% if message.tags %} class="{{ message.tags }}"{% endif %}>{{ message }}</li>
{% endfor %}
</ul>
{% endif %}
|
Now you know how to use flash messages let's put it to use in add post form.
Open cadmin's views.py and modify it as follows to use django.contrib.messages framework:
TGDB/django_project/cadmin/views.py
1 2 3 4 5 6 7 8 9 10 11 12 13 14 15 16 17 18 19 20 21 22 23 24 25 26 27 28 | from django.shortcuts import render, redirect
from blog.forms import PostForm
from django.contrib import messages
# Create your views here.
def post_add(request):
# If request is POST, create a bound form (form with data)
if request.method == "POST":
f = PostForm(request.POST)
# check whether form is valid or not
# if the form is valid, save the data to the database
# and redirect the user back to the add post form
# If form is invalid show form with errors again
if f.is_valid():
# save data
f.save()
messages.add_message(request, messages.INFO, 'Post added.')
return redirect('post_add')
# if request is GET the show unbound form to the user
else:
f = PostForm()
return render(request, 'cadmin/post_add.html', {'form': f})
|
Next, to display the flash message modify post_add.html as follows:
1 2 3 4 5 6 7 8 9 10 11 12 13 14 15 16 17 | {# ... #}
<p>» <a href="">All Posts</a> » Add Post</p>
<h3>Add Post</h3>
{% if messages %}
<ul class="messages">
    {% for message in messages %}
    <li{% if message.tags %} class="{{ message.tags }}"{% endif %}>{{ message }}</li>
    {% endfor %}
</ul>
{% endif %}
<form action="" method="post">
{% csrf_token %}
<table>
{# ... #}
|
Revisit add post form at http://127.0.0.1:8000/cadmin/post/add/ and create a new post. This time you will get a success message like this:

Updating Posts #
In updating a record the first step is to show a form pre-populated with data from the database. Django provides instance attribute just for this task. The following shell session demonstrates how to use it.
1 2 3 4 5 6 7 8 9 10 11 12 13 14 15 16 17 18 19 20 21 22 23 24 25 26 27 28 29 30 31 32 33 34 35 36 37 38 39 40 41 42 43 44 45 46 47 48 49 50 51 52 53 54 55 | >>>
>>> from blog.models import Post
>>> from blog.forms import PostForm
>>>
>>>
>>> p = Post.objects.get(id=3)
>>> p
<Post: The Great Django Blog>
>>>
>>>
>>> f = PostForm(instance=p)
>>>
>>>
>>> print(f.as_p())
<p>
<label for="id_title">Title:</label>
<input id="id_title" maxlength="200" name="title" type="text" value="The Great Django Blog" required />
</p>
<p>
<label for="id_content">Content:</label>
<textarea cols="40" id="id_content" name="content" rows="10" required>
A Django project can be configured with one or several template engines (or even
zero if you don't use templates). Django ships built-in backends for its ow
n template system, creatively called the Django template language (DTL), and for
the popular alternative Jinja2.
</textarea>
</p>
<p>
<label for="id_author">Author:</label>
<select id="id_author" name="author" required>
<option value="">---------</option>
<option value="6">tom</option>
<option value="7">jerry</option>
<option value="8">spike</option>
<option value="9" selected="selected">tyke</option>
<option value="10">jetson</option>
</select>
</p>
<p>
<label for="id_category">Category:</label>
<select id="id_category" name="category" required>
<option value="">---------</option>
<option value="1" selected="selected">python</option>
<option value="3">java</option>
<option value="4">cat</option>
</select>
</p>
<p>
<label for="id_tags">Tags:</label>
<select multiple="multiple" id="id_tags" name="tags" required>
<option value="1">django</option>
<option value="2" selected="selected">flask</option>
</select>
</p>
>>>
|
Notice that the output of print(f.as_p()) contains all the form fields pre-populated with data from the database.
At this point, you might say, "Our form has data so it should be in bound state" right? The answer is: No, the form is still in unbound state. The use of instance attribute is only restricted to displaying data. That's it. We can verify this fact by using is_bound attribute on the form object.
1 2 3 4 | >>>
>>> f.is_bound
False
>>>
|
So how we bind data to the form while updating objects?
To bind the data to the form pass a dictionary containing data, along with the instance attribute like this:
1 2 3 4 5 | >>>
>>> f = PostForm({}, instance=p)
>>> f.is_bound
True
>>>
|
Although the dictionary is empty, our form is still in bound state.
In the real world we would be passing request.POST instead of an empty dictionary ({}).
f = CategoryForm(request.POST, instance=c)
Another important thing to keep in mind is that while saving the data, the save() method will use data from request.POST not from instance=c.
Let's use this knowledge to create post update form.
Open cadmin app's views.py and add the post_update() view function after post_add() view as follows:
TGDB/django_project/cadmin/views.py
1 2 3 4 5 6 7 8 9 10 11 12 13 14 15 16 17 18 19 20 21 22 23 24 25 26 27 28 29 30 | from django.shortcuts import render, redirect, get_object_or_404, reverse
from blog.forms import PostForm
from django.contrib import messages
from blog.models import Post, Author, Category, Tag
#...
def post_update(request, pk):
post = get_object_or_404(Post, pk=pk)
# If request is POST, create a bound form(form with data)
if request.method == "POST":
f = PostForm(request.POST, instance=post)
# check whether form is valid or not
# if the form is valid, save the data to the database
# and redirect the user back to the update post form
# If form is invalid show form with errors again
if f.is_valid():
f.save()
messages.add_message(request, messages.INFO, 'Post updated.')
return redirect(reverse('post_update', args=[post.id]))
# if request is GET the show unbound form to the user, along with data
else:
f = PostForm(instance=post)
return render(request, 'cadmin/post_update.html', {'form': f, 'post': post})
|
Create a new template called post_update.html in cadmin/templates/cadmin, with the following code:
TGDB/django_project/cadmin/templates/cadmin/post_update.html
1 2 3 4 5 6 7 8 9 10 11 12 13 14 15 16 17 18 19 20 21 22 23 24 25 26 27 28 29 30 31 32 33 34 35 | {% extends "cadmin/base_admin.html" %}
{% block title %}
Update Post - {{ block.super }}
{% endblock %}
{% block main %}
<div class="main">
<p>» <a href="">All Posts</a> » Post Update</p>
<h3>Post Update</h3>
{% if messages %}
<ul class="messages">
{% for message in messages %}
<li{% if message.tags %} class="{{ message.tags }}"{% endif %}>{{ message }}</li>
{% endfor %}
</ul>
{% endif %}
<form action="" method="post">
{% csrf_token %}
<table>
{{ form.as_table }}
<tr>
<td></td>
<td><input type="submit" value="Update Post"></td>
</tr>
</table>
</form>
</div>
{% endblock %}
|
Finally, add a URL pattern called post_update to cadmin's urls.py as follows:
TGDB/django_project/cadmin/urls.py
1 2 3 4 5 | #...
urlpatterns = [
url(r'^post/add/$', views.post_add, name='post_add'),
url(r'^post/update/(?P<pk>[\d]+)/$', views.post_update, name='post_update'),
]
|
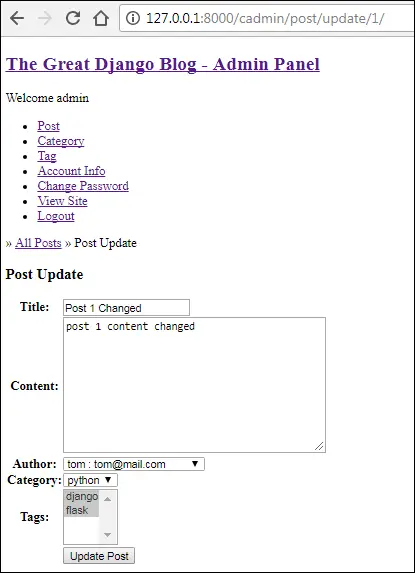
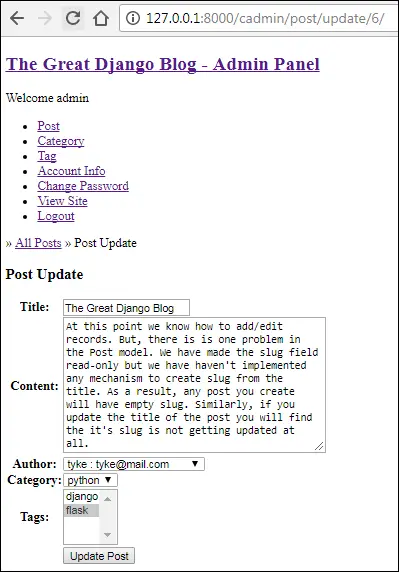
Our post update page is ready, visit http://127.0.0.1:8000/cadmin/post/update/1/ to edit the post whose primary key is 1. You should see post update page like this:
Note: In case you don't have a post whose primary key is 1, then simply specify any primary key which does exist in your blog_post table.
Just like Add post page, Post update page shows validation errors as well as pre-populates the data from the previous request. When you are done updating the post, hit "Update Post" button to save your changes to the database.
Specifying the primary key of the post manually in the URL is slightly awkward! That's why in the next step we will add a link to post update page in post detail page.
Open post_detail.html in the blog app and update the template to include a link to post_update URL pattern as follows:
TGDB/django_project/blog/templates/blog/post_detail.html
1 2 3 4 5 6 7 8 9 10 11 12 | {# ... #}
<div class="section-inner clearfix">
<h1>{{ post.title|capfirst }}</h1>
<p class="post-info">
{% include 'blog/post_info.html' %}
| <span><a href="{% url 'post_update' post.id %}">Edit</a></span>
</p>
<p>
{{ post.content }}
</p>
</div>
{# ... #}
|
Now visit post detail page and you should see a link with anchor "Edit", just after the tag like this:
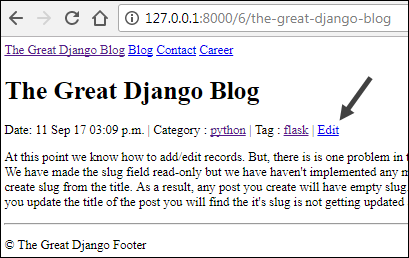
Click on the link and it will take you to the post update page for that post.
That's enough for now, we will add pages to add and update categories and tags later.
Note: To checkout this version of the repository type git checkout 21a.
Load Comments