Migrations in Django
Last updated on July 27, 2020
Migration is a way to create or alter tables in the database. In Django, the common workflow of working with models is as follows:
- Create or change models in
models.pyfile. - Create migration file.
- Commit changes to the database using the migration file created in step 2.
Here are two reasons why migration is the preferred way of creating or altering tables instead of manually executing SQL queries.
- Writing SQL queries takes time and they are error-prone. On the other hand, migration is quite easy and doesn't require to write any SQL.
- Using migrations you can revert back your entire databases to sometime back in the past with a single command. You could think of migrations as a version control for databases.
Let's create some migrations.
Checking Models for Error #
Django provides a check command which checks for errors in models.py file.
(env) C:\Users\Q\TGDB\django_project>python manage.py check
System check identified no issues (0 silenced).
The "System check identified no issues (0 silenced)" indicates that no errors were found. Now we are ready to create our first migration. You should always use the check command to look for errors in your models before creating a migration file.
Creating Migrations #
We use makemigrations command to create migrations. Open terminal and type the following command.
(env) C:\Users\Q\TGDB\django_project>python manage.py makemigrations blog
Migrations for 'blog':
  blog\migrations\0001_initial.py:
    - Create model Author
    - Create model Category
    - Create model Post
    - Create model Tag
    - Add field tags to post

(env) C:\Users\Q\TGDB\django_project>
In the above command, we have specified the blog app, although this is optional. If not specified then Django would create migrations for all installed apps, only if there are any changes in the models.py file of the respective app.
Django will create migrations or migration file only when it detects changes in the models.py file. Try running the makemigrations command once again but this time without specifying the name of the app.
(env) C:\Users\Q\TGDB\django_project>python manage.py makemigrations
No changes detected

(env) C:\Users\Q\TGDB\django_project>
Because there are no new changes since the last time we executed makemigrations command, we get "No changes detected".
So what makemigrations command did?
The makemigrations command has created a migration file named 0001_initial.py in the migrations directory of the blog app. This migration file reflects the current state of our models. We will use this migration file to update our database. In other words, Django will use migration file to create SQL queries to update the current state of the database, so that it is in sync with models.py.
You can view the actual SQL queries that 0001_initial.py would generate to alter the current state of the database by using the sqlmigrate command. The sqlmigrate requires two arguments, name of the app and migration name. You don't need to pass full name of the migration file, starting few characters is enough.
(env) C:\Users\Q\TGDB\django_project>python manage.py sqlmigrate blog 0001
BEGIN;
--
-- Create model Author
--
CREATE TABLE "blog_author" ("id" integer NOT NULL PRIMARY KEY AUTOINCREMENT, "na
me" varchar(50) NOT NULL, "email" varchar(254) NOT NULL UNIQUE, "active" bool NO
T NULL, "created_on" datetime NOT NULL, "last_logged_in" datetime NOT NULL);
--
-- Create model Category
--
CREATE TABLE "blog_category" ("id" integer NOT NULL PRIMARY KEY AUTOINCREMENT, "
name" varchar(50) NOT NULL UNIQUE, "slug" varchar(50) NOT NULL);
--
-- Create model Post
--
...
CREATE UNIQUE INDEX "blog_post_tags_post_id_4925ec37_uniq" ON "blog_post_tags" (
"post_id", "tag_id");
CREATE INDEX "blog_post_tags_f3aa1999" ON "blog_post_tags" ("post_id");
CREATE INDEX "blog_post_tags_76f094bc" ON "blog_post_tags" ("tag_id");
COMMIT;

(env) C:\Users\Q\TGDB\django_project>
Note: Output is truncated to save space.
Lines starting with -- are comments, everything else is plain old SQL. It is important to note that sqlmigrate doesn't commit these changes to the database, it just prints the raw SQL that Django would use to make changes to the database.
To commit these changes to the database Django provides another command called migrate.
But before we run migrate command. Let's take a look at the current state of our database using Navicat.
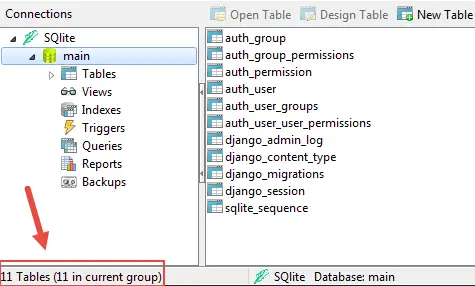
At this point, we have 11 tables in our database. Okay, now let's run the migrate and see what happens.
1 2 3 4 5 6 7 8 9 | (env) C:\Users\Q\TGDB\django_project>python manage.py migrate
Operations to perform:
Apply all migrations: admin, auth, blog, contenttypes, sessions
Running migrations:
Rendering model states... DONE
Applying blog.0001_initial... OK
(env) C:\Users\Q\TGDB\django_project>
|
If you don't already have a database then migrate command will create an SQLite database named db.sqite3 in the project's root directory i.e TGDB/django_project.
On the other hand, if you already have a database then Django will modify the existing database so that it is in sync with our models.
Let's re-open our SQLite database and see how many tables are there now.
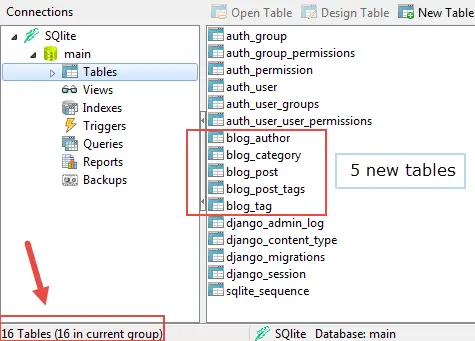
We now have 16 tables, the migrate command has created 5 new tables for us. Wait! why 5 ? we have created only 4 new models right? Why one extra?
Django has created an extra table (blog_post_tags) to manage a many-to-many relationship between post and tags. This is not specific to Django, in fact, this is how the database works.
All the tables which start with "blog_" belongs to the blog app. Here is the rundown of each table:
blog_author- to store authors.blog_category- to store categories.blog_tag- to store tags.blog_post- to store blog posts.blog_post_tags- to manage many-to-many relationship between post and tag. In database jargon, this table is known as Conjunction table.
Once More #
Just to make sure you understand migrations completely. We will demonstrate it one more time. In this section, we are going to rename one of the fields of the Post model from pub_date to publication_date using migration and then we will revert the changes using migrations.
Open models.py inside the blog app and rename the field pub_date to publication_date as follows:
TGDB/django_project/blog/models.py
1 2 3 4 5 6 7 8 | #...
class Post(models.Model):
#...
content = models.TextField()
publication_date = models.DateTimeField(auto_now_add=True)
author = models.ForeignKey(Author)
#...
#...
|
Step 1 - Check for errors in the model using the check command.
(env) C:\Users\Q\TGDB\django_project>python manage.py check
System check identified no issues (0 silenced).

(env) C:\Users\Q\TGDB\django_project>
We don't have any errors in models.py file. Let's create our migration file now.
Step 2 - Create migration file using makemigrations command.
(env) C:\Users\Q\TGDB\django_project>python manage.py makemigrations blog

Did you rename post.pub_date to post.publication_date (a DateTimeField)? [y/N] y

Migrations for 'blog':
  blog\migrations\0002_auto_20170203_1046.py:
    - Rename field pub_date on post to publication_date

(env) C:\Users\Q\TGDB\django_project>
After executing makemigrations command Django will prompt you to verify the changes. Press Y or y to confirm. This will create a new migration file inside the migrations directory in the blog app.
Step 3 (optional) - View the SQL query that Django would use to update the database using the sqlmigrate command.
(env) C:\Users\Q\TGDB\django_project>python manage.py sqlmigrate blog 0002
BEGIN;
--
-- Rename field pub_date on post to publication_date
--
ALTER TABLE "blog_post" RENAME TO "blog_post__old";
CREATE TABLE "blog_post" ("id" integer NOT NULL PRIMARY KEY AUTOINCREMENT, "publ
ication_date" datetime NOT NULL, "title" varchar(50) NOT NULL, "slug" varchar(50
) NOT NULL UNIQUE, "content" text NOT NULL, "author_id" integer NOT NULL REFEREN
CES "blog_author" ("id"), "category_id" integer NOT NULL REFERENCES "blog_catego
ry" ("id"));
INSERT INTO "blog_post" ("category_id", "content", "slug", "publication_date", "
author_id", "id", "title") SELECT "category_id", "content", "slug", "pub_date",
"author_id", "id", "title" FROM "blog_post__old";
DROP TABLE "blog_post__old";
CREATE INDEX "blog_post_4f331e2f" ON "blog_post" ("author_id");
CREATE INDEX "blog_post_b583a629" ON "blog_post" ("category_id");
COMMIT;

(env) C:\Users\Q\TGDB\django_project>
Well, that's a lot of code for a single field rename. If you were not using migrations then you would have to write all this code by yourself. Thanks to migrations, you are in luck.
Step 4 - Commit the changes stored in the migration file to the database using the migrate command.
(env) C:\Users\Q\TGDB\django_project>python manage.py migrate
Operations to perform:
  Apply all migrations: admin, auth, blog, contenttypes, sessions
Running migrations:
  Applying blog.0002_auto_20170203_1046... OK

(env) C:\Users\Q\TGDB\django_project>
Rolling Back Migrations #
Let's say for some reason we don't like the change we have made to the Post model. There are two ways to revert the changes we have made:
1st method #
Change the name of field from publication_date to pub_date in models.py, create migration file and commit the changes:
TGDB/django_project/blog/models.py
1 2 3 4 5 6 7 8 | #...
class Post(models.Model):
#...
content = models.TextField()
pub_date = models.DateTimeField(auto_now_add=True) # field name changed to pub_date again
author = models.ForeignKey(Author)
#...
#...
|
Step 1 - Again check for errors using the check command.
(env) C:\Users\Q\TGDB\django_project>python manage.py check
System check identified no issues (0 silenced).

(env) C:\Users\Q\TGDB\django_project>
Step 2 - Create migration file using the makemigrations command.
(env) C:\Users\Q\TGDB\django_project>python manage.py makemigrations blog
Did you rename post.publication_date to post.pub_date (a DateTimeField)? [y/N] y

Migrations for 'blog':
  blog\migrations\0003_auto_20170203_1126.py:
    - Rename field publication_date on post to pub_date

(env) C:\Users\Q\my_workspace\django_project>
Step 3 (optional) - View SQL using sqlmigrate command.
(env_mysite) C:\Users\Q\TGDB\django_project>python manage.py sqlmigrate blog 0003
blog 0003
BEGIN;
--
-- Rename field publication_date on post to pub_date
--
ALTER TABLE "blog_post" RENAME TO "blog_post__old";
CREATE TABLE "blog_post" ("id" integer NOT NULL PRIMARY KEY AUTOINCREMENT, "pub_
date" datetime NOT NULL, "title" varchar(50) NOT NULL, "slug" varchar(50) NOT NU
LL UNIQUE, "content" text NOT NULL, "author_id" integer NOT NULL REFERENCES "blo
g_author" ("id"), "category_id" integer NOT NULL REFERENCES "blog_category" ("id
"));
INSERT INTO "blog_post" ("content", "slug", "author_id", "id", "title", "pub_dat
e", "category_id") SELECT "content", "slug", "author_id", "id", "title", "public
ation_date", "category_id" FROM "blog_post__old";
DROP TABLE "blog_post__old";
CREATE INDEX "blog_post_4f331e2f" ON "blog_post" ("author_id");
CREATE INDEX "blog_post_b583a629" ON "blog_post" ("category_id");
COMMIT;

(env) C:\Users\Q\TGDB\django_project>
Step 4 - Commit the changes to the database using the migrate command.
(env) C:\Users\Q\TGDB\django_project>python manage.py migrate
Operations to perform:
  Apply all migrations: admin, auth, blog, contenttypes, sessions
Running migrations:
  Applying blog.0003_auto_20170203_1126... OK

(env) C:\Users\Q\TGDB\django_project>
2nd method #
Instead of modifying the models.py and creating new migration file using makemigrations command, we could just revert the migration using the migrate command. To do so, just pass the app_name followed by name of the migration file you want to migrate to. In this case, app_name is blog and the name of the migration file we want to migrate to starts with 0001. So, to revert the changes execute the following command.
(env) C:\Users\Q\TGDB\django_project>python manage.py migrate blog 0001
Operations to perform:
  Target specific migration: 0001_initial, from blog
Running migrations:
  Rendering model states... DONE
  Unapplying blog.0002_auto_20170325_2054... OK

(env) C:\Users\Q\TGDB\django_project>
I recommend you to run this command, even if you have already changed the column name to pub_date using the 1st method so that we are all on the same page.
Executing this command will not create any new migrations. At this point, you could again apply 0002 migration. By typing the following command.
(env) C:\Users\Q\ws2\django_project>python manage.py migrate blog 0002
Operations to perform:
  Target specific migration: 0002_auto_20170325_2054, from blog
Running migrations:
  Applying blog.0002_auto_20170325_2054... OK

(env) C:\Users\Q\TGDB\django_project>
However, We don't want to ever come back to 0002 and 0003 migrations. So it is best to delete them from the migrations directory.
You are probably getting hang of this now. Hopefully, you should now have a better understanding of migrations in general and how they are used in Django. If you still have some confusion I suggest you re-read this chapter several times more.
Note: To checkout this version of the repository type git checkout 12a.
Load Comments